Everyone remembers my famous last post about making Caps Lock idempotent. Here’s how to do it on Linux with xkb (assuming you’re running xkb).
wtf is xkb?
XKB (X Keyboard Extension) is the Linux/Unix system that controls how your keyboard behaves at a low level. It defines keymaps, layouts, modifiers, and rules for translating key presses into characters and actions. If you switch layouts, remap keys, or use advanced shortcuts on Linux, XKB is usually doing the heavy lifting under the hood.
Seems like a lifetime ago I started writing and throwing my thoughts out into the void for fun. I installed WordPress after maintaining my own internal pages seemed tedious, and never looked back. As part of the percentage of people who actually use WP for its intended purpose, I’m in a bit of a love-hate relationship.
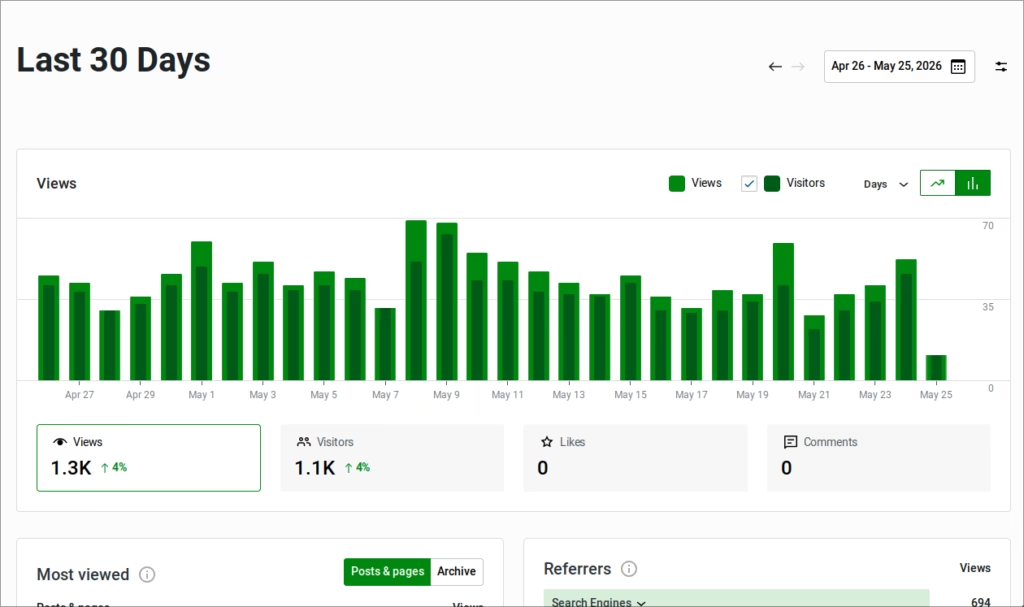
Fun stats from the blog page for May.
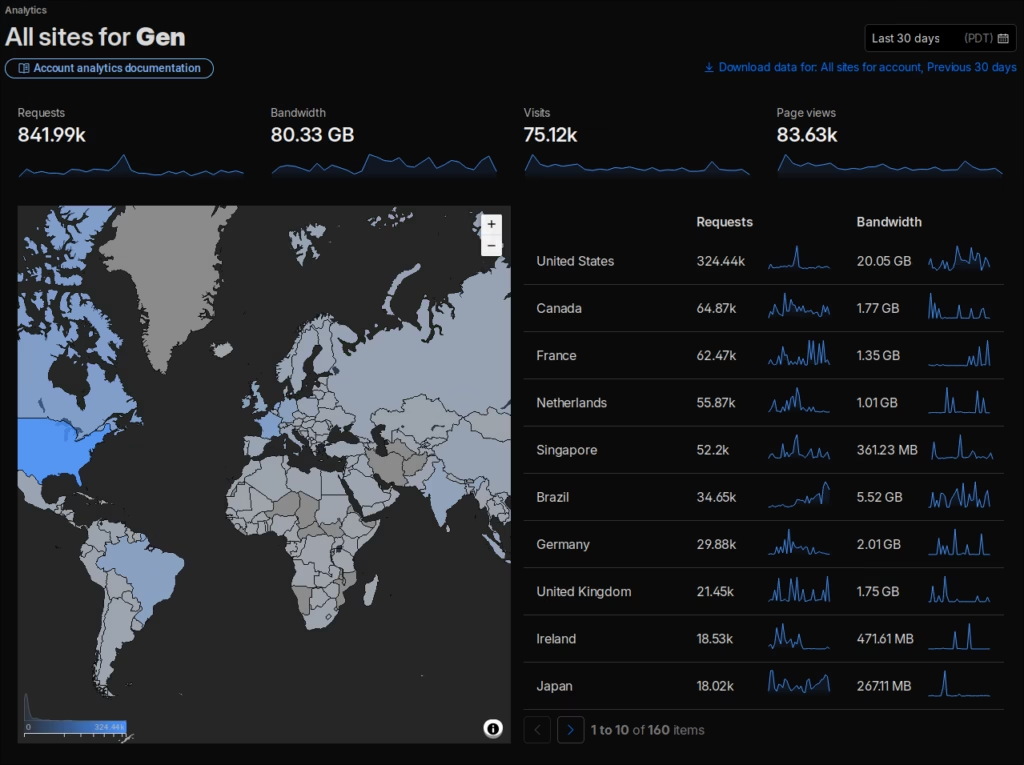
It’s a tiny chunk of the stats for every web property I own.
Might even have some growth this year if I can manage to update it more than every 5 months!
It helps me if you share this post
https://rose.dev/blog/2026/05/25/100-blog-posts/
hyprwinwrap allows specific application windows to be rendered behind the desktop as pinned background layers. Matching windows are intercepted by the plugin, converted into unmanaged floating surfaces, and rendered during Hyprland’s RENDER_POST_WALLPAPER stage.
What makes it interesting is that the “wallpaper” can now be an actual running application:
• mpv video wallpapers • cava audio visualizers • shader demos • OpenGL scenes • animated dashboards • generative art renderers • live telemetry panels
plugin {
    hyprwinwrap {
        class = window-bg
        title = window-bg
        # Position of the window in a percentage
        pos_x = 0
        pos_y = 0
        # Size of the window in a percentage
        size_x = 100
        size_y = 100
    }
}


exec-once = foot --app-id=window-bg sh -c "cmatrix"
The application itself defines the window class or app-id, and hyprwinwrap simply matches against it. The plugin also supports percentage based sizing and positioning, allowing background windows to occupy arbitrary regions of the screen instead of acting only as fullscreen wallpapers.
If a program’s background is transparent, it will appear layered above your wallpaper:
exec-once = foot -o colors-dark.alpha=0.0 --app-id=window-bg sh -c "cmatrix"
While customizing my desktop with fun little overlays using Hyprwinwrap, I thought it would be really cool to display shaders on top of my wallpaper. After trying and failing to find an existing program that would suit my needs, a new project idea was born.
Awesome, but maybe you want something more “interesting”. Here’s a ShaderToy converted shader called Eon:
I realized early in the project most of the fun ShaderToy projects use layering with iChannels and more than one shader. This program uses a similar structure so it’s possible to achieve advanced effects.
Cellular automata simulation
For instance, put a file named “shader0.frag/shader0.vert” next to wayshader for a basic one shader setup. If you need multipass rendering on that one shader, simply insert uniform sampler2D u_sampler0 as a variable. u_sampler0 will then contain a reference to last frame’s buffer so you can make trails, transformations, etc.
Want another layer? Easy. Add “shader1.frag/shader1.vert” next to the program. This shader will be rendered as its own pass on top of the previous shader.
The u_sampler variables are mapped to each shader’s index; u_sampler0 is always a reference to shader0‘s buffer. shader1 has access to u_sampler1, which is a reference to its own buffer. shader2 will have access to u_sampler0, u_sampler1, and u_sampler2 (its own buffer). Supports up to 32 “channels” with the same pattern.
It also provides basic inputs in the form of u_resolution, u_time, and u_frame.
Linux is a real joy compared to Windows. Finally, my computer is my own again. No more nagging ads, settings changing automatically, or random telemetry taking up valuable CPU time. Using Linux is like getting rid of that old 1961 American Rambler and finally joining modern society with an electric car.
Using Hyprland is like ditching your car for a spaceship. Not very practical for commuting, but really fun nonetheless. And, everyone stares at you whenever you land it in the grocery store parking lot, so it’s all worth it, right?
Since Hyprland is a relatively new Wayland compositor, there are a few things that bothered me when attempting to implement the experience I wanted.
Hyprland has a built in setting (input:touchpad:disable_while_typing) to hopefully prevent palms from messing with the cursor. If you’re lucky, Hyprland thinks your touchpad is a mouse, so this setting doesn’t work at all.
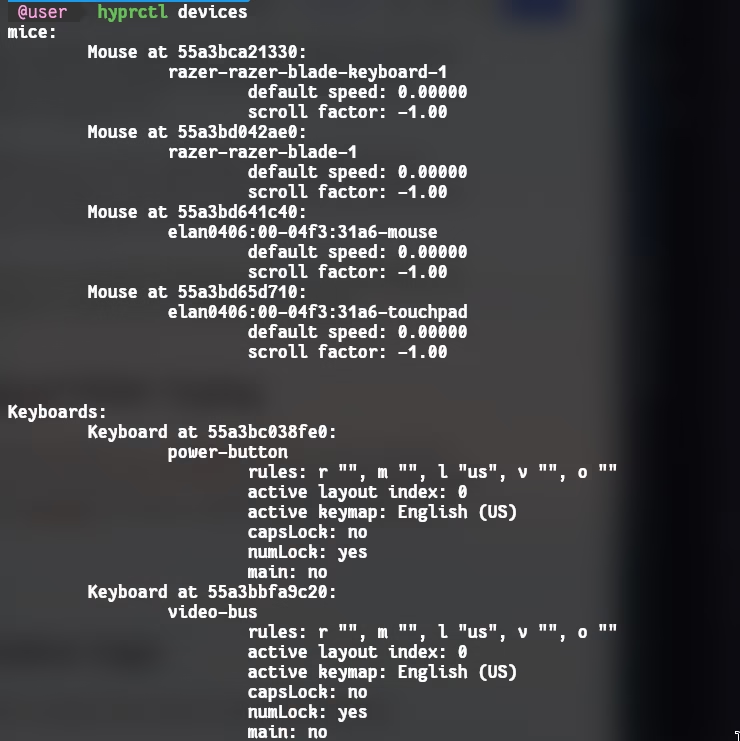
hyprctl devices
We can re-implement our desired behavior:
Read input from our main keyboard
Disable the touchpad device on input
Re-enable the touchpad device after X ms have elapsed
First we’ll figure out our devices.
ls /dev/input/by-id/
There may be a few that match what we’re looking for. usb-Razer_Razer_Blade-if01-event-kbd was the one that worked in my case.
And then from the previous screenshot where we ran hyprctl devices, we’ve already discovered the touchpad is elan0406:00-04f3:31a6-touchpad.
We could choose any language to write a daemon, but I’ll pick C. It’s fast, performant, and has a tiny memory footprint. This will allow the daemon/program to sit at 0% CPU usage when idle and take up mere megabytes of our RAM.
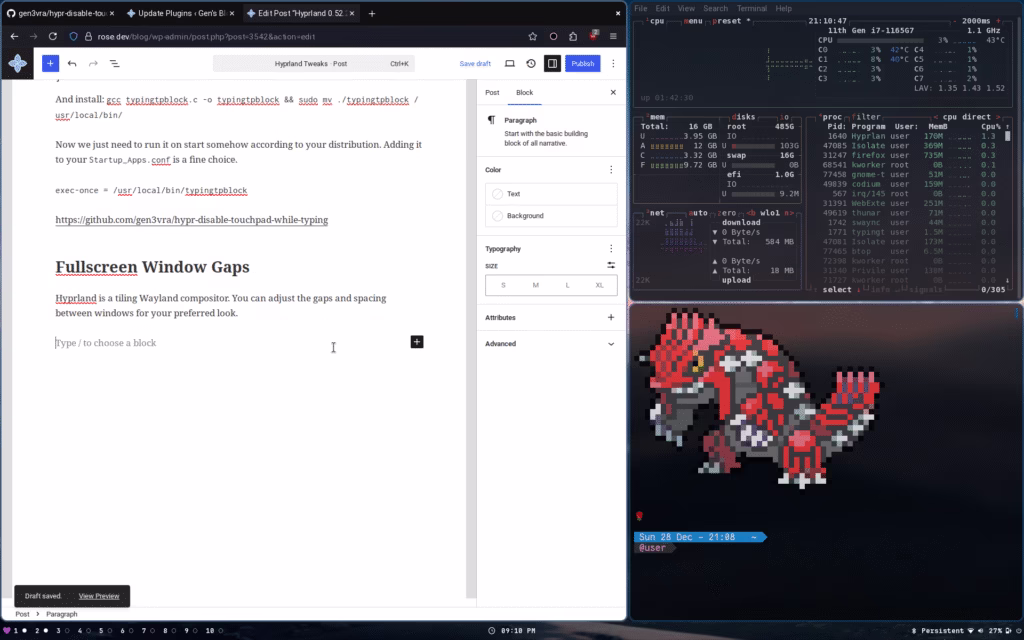
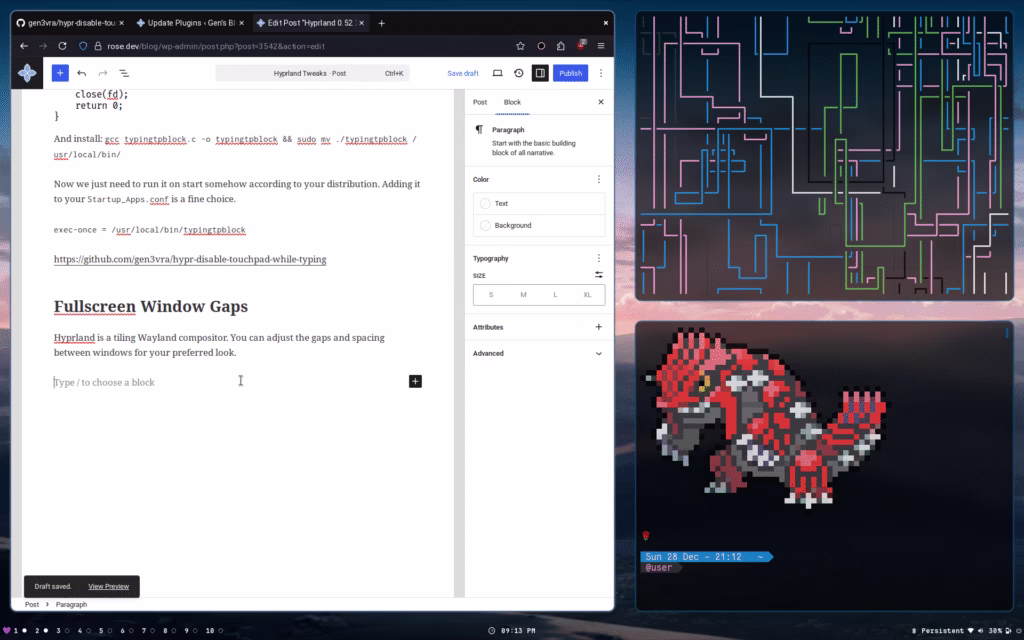
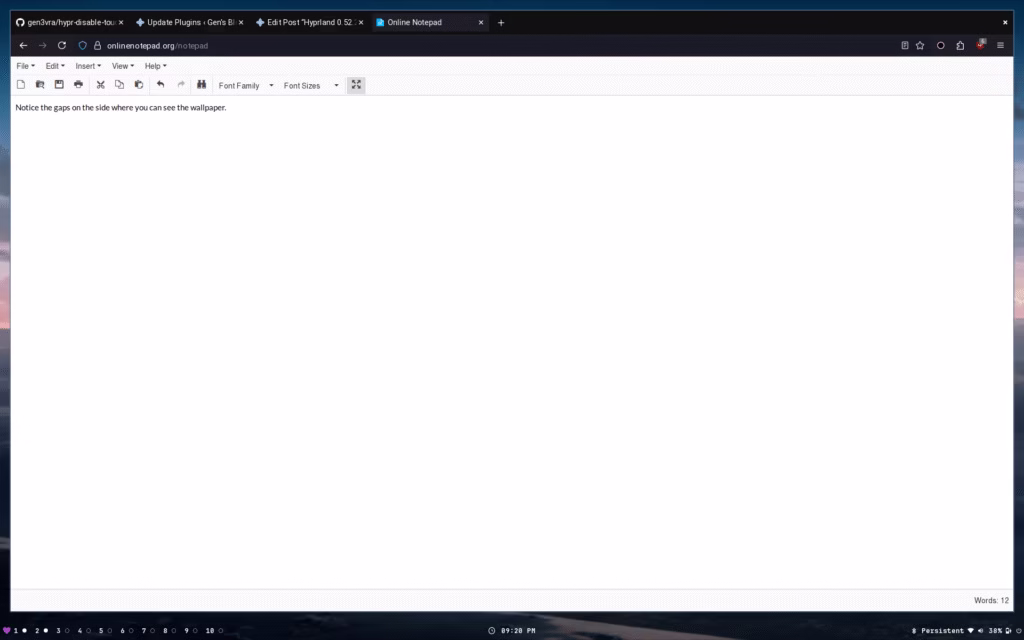
Unfortunately, when you fullscreen an application the gaps you chose will stay the same. This means no matter your gap preference, unless it’s 0, you can see behind the window.
You also have to disable rounded corners, otherwise there will be tiny gaps in all four quadrants.
Additionally, by default there’s no visual variation between a window that exists by itself on a workspace, and a fullscreen window. This can lead to confusion unless you explicitly style fullscreen windows borders differently.
We can add some configurations to our hyprland.conf to differentiate it a bit.
windowrule = bordercolor rgb(ffc1e4), fullscreen:1
windowrule = rounding 0, fullscreen:1
windowrule = bordersize 2, fullscreen:1 # or 0 for none
As stated above, if we’ve set any gap size at all, there will still be space between the fullscreen window and the screen edge. This is not ideal.
Let’s fix it. You’d think we can just do something similar to the above, right?
Wrong! These are not valid properties. You must set them in the general or workspace namespace.
Okay, so we want an application that can do the following:
Keep track of the fullscreen state
Change the configuration when fullscreen
Leave all other windows alone
We could bind a fullscreen shortcut to run a script that would both update the gap settings and toggle fullscreen for the active window. This seems fine and recommended. Unfortunately this is a bad solution, because there are way too many edge cases to handle.
Double clicking a titlebar to maximize would not trigger our solution
Maximizing, then closing the application window would not update our tracked boolean, making the next maximize do nothing until pressed twice
Maximizing, then tabbing to another workspace would mean our settings changes remain, making all normal windows have no gap
We could try to track window closes and any potential edge case, but it becomes messy and complex quickly, without solving the problem cleanly.
The solution is yet another lightweight daemon. We can track fullscreen changes directly from the compositor socket itself, ensuring we catch everything. Once we know the fullscreen state and which window specifically, it’s trivial to hand that information off to a script that handles setting changes for us.
But wait, how does this solve the problem of settings applying to all our other windows which aren’t fullscreen? The hint was mentioned above.
Hyprland has individual workspace separated settings, so you can do something like this:
workspace = 1, gapsin:3, gapsout:2
workspace = 2, gapsin:10, gapsout:10 # example
workspace = 3, gapsin:5, gapsout:12 # example
workspace = 4, gapsin:20, gapsout:9 # example
This is important because logically, if a window were fullscreened on a certain workspace, no other windows are visible. That means an individual workspace config essentially becomes that window’s config.
The last piece we need is to find out where we can get window information from. The hyprctl activewindow -j command is perfectly suitable for this.
I’m going to write the daemon in C again for the same reasons mentioned above.
#define _GNU_SOURCE
#include <errno.h>
#include <stdio.h>
#include <stdlib.h>
#include <string.h>
#include <sys/socket.h>
#include <sys/un.h>
#include <unistd.h>
#define BUF_SIZE 4096
static void tag_window(const char *addr, int add) {
  if (!addr || !addr[0])
    return;
  char cmd[512];
  int ret =
      snprintf(cmd, sizeof(cmd),
               "hyprctl dispatch tagwindow %s%sfullscreen_mode address:%s > /dev/null 2>&1",
               add ? "+" : "-- -", add ? "" : "", addr);
  if (ret < 0 || ret >= sizeof(cmd))
    return;
  system(cmd);
}
static void run_fullscreen_handler(const char *addr, int fs, int workspace) {
  if (!addr || !addr[0])
    return;
  char cmd[512];
  int ret = snprintf(
      cmd, sizeof(cmd),
      "/home/user/.config/hypr/UserScripts/FullscreenHandler.sh %s %d %d > /dev/null 2>&1",
      addr, fs, workspace);
  if (ret < 0 || ret >= sizeof(cmd))
    return;
  system(cmd);
}
static void query_active_window(void) {
  FILE *fp = popen("hyprctl activewindow -j", "r");
  if (!fp) {
    fprintf(stderr, "Failed to query active window\n");
    return;
  }
  char buf[BUF_SIZE];
  char address[128] = {0};
  int fullscreen = -1;
  int workspace = -1;
  int in_workspace = 0;
  while (fgets(buf, sizeof(buf), fp)) {
    if (strstr(buf, "\"address\"")) {
      sscanf(buf, " \"address\": \"%[^\"]\"", address);
    }
    if (strstr(buf, "\"fullscreen\"")) {
      sscanf(buf, " \"fullscreen\": %d", &fullscreen);
    }
    // Handle json workspace object
    if (strstr(buf, "\"workspace\"")) {
      in_workspace = 1;
    }
    if (in_workspace && strstr(buf, "\"id\"")) {
      sscanf(buf, " \"id\": %d", &workspace);
      in_workspace = 0;
    }
  }
  pclose(fp);
  if (fullscreen == -1 || !address[0] || workspace == -1)
    return;
  //printf("fullscreen=%d window=%s workspace=%d\n", fullscreen, address, workspace);
  //fflush(stdout);
  if (fullscreen == 1) {
    tag_window(address, 1);
  } else if (fullscreen == 0) {
    tag_window(address, 0);
  }
  run_fullscreen_handler(address, fullscreen, workspace);
}
int main(void) {
  const char *runtime = getenv("XDG_RUNTIME_DIR");
  const char *sig = getenv("HYPRLAND_INSTANCE_SIGNATURE");
  if (!runtime || !sig) {
    fprintf(stderr, "Hyprland environment not detected\n");
    return 1;
  }
  char sockpath[512];
  int ret = snprintf(sockpath, sizeof(sockpath), "%s/hypr/%s/.socket2.sock",
                     runtime, sig);
  if (ret < 0 || ret >= sizeof(sockpath)) {
    fprintf(stderr, "Socket path too long\n");
    return 1;
  }
  int fd = socket(AF_UNIX, SOCK_STREAM, 0);
  if (fd < 0) {
    perror("socket");
    return 1;
  }
  struct sockaddr_un addr = {0};
  addr.sun_family = AF_UNIX;
  strncpy(addr.sun_path, sockpath, sizeof(addr.sun_path) - 1);
  if (connect(fd, (struct sockaddr *)&addr, sizeof(addr)) < 0) {
    perror("connect");
    close(fd);
    return 1;
  }

  // Normalize workspaces
  char cmd[512];
  int resetRet = snprintf(
      cmd, sizeof(cmd),
      "/home/user/.config/hypr/UserScripts/FullscreenHandler.sh %s %d %d > /dev/null 2>&1",
      "discard", -1, -1);
  if (resetRet < 0 || resetRet >= sizeof(cmd))
    return 1;
  system(cmd);

  // Watch for changes
  char buf[BUF_SIZE];
  while (1) {
    ssize_t n = read(fd, buf, sizeof(buf) - 1);
    if (n < 0) {
      if (errno == EINTR)
        continue;
      perror("read");
      break;
    }
    if (n == 0)
      break;
    buf[n] = '\0';
    if (strstr(buf, "fullscreen>>")) {
      query_active_window();
    }
  }
  close(fd);
  return 0;
}
This program will be updated with each fullscreen change from Hyprland itself. It then passes the actual action off to FullscreenHandler.sh with the window address, fullscreen status, and workspace. It also tags the window in case we want to do any future actions, but you may omit this part without any loss of functionality.
The handler script is quite basic, and will update the actual settings.
#!/bin/bash
ADDR="$1"
FS="$2"          # 0, 1, or 2
WS="$3"          # 1-10, or -1 to reset all

# Config file to edit
HYPR_CONF="$HOME/.config/hypr/UserConfigs/UserDecorations.conf"  # adjust if needed

# Normal vs Fullscreen configuration
NO_BORDER_GAP="gapsin:0, gapsout:0"
NORMAL_BORDER_GAP="gapsin:3, gapsout:2"

if [ "$WS" -eq -1 ]; then
    for i in {1..10}; do
        LINE_TO_INSERT="workspace = ${i}, $NORMAL_BORDER_GAP"
        sed -i "/^#${i}:DYNAMIC WORKSPACE PLACEHOLDER \[ns\]/{n;s/.*/$LINE_TO_INSERT/;}" "$HYPR_CONF"
    done
    #echo "Reset all workspaces to normal padding"
    exit 0
fi

# 0 = not fs, 1 = fs, 2 = exclusive fs
if [ "$FS" -eq 1 ]; then
    LINE_TO_INSERT="workspace = ${WS}, $NO_BORDER_GAP"
else
    LINE_TO_INSERT="workspace = ${WS}, $NORMAL_BORDER_GAP"
fi

# Use sed to replace the line after the workspace comment, in-place
sed -i "/^#${WS}:DYNAMIC WORKSPACE PLACEHOLDER \[ns\]/{n;s/.*/$LINE_TO_INSERT/;}" "$HYPR_CONF"
#echo "Updated workspace $WS with $( [ $FS -eq 1 ] && echo 'no-border padding' || echo 'normal padding')"
There’s probably a better way than using sed. Regardless, if you structure a section in your UserDecorations.conf as the script expects, it will work perfectly.
## EXAMPLE ##
# You CAN use a tag but it has a few ms delay and we can handle everything needed with fullscreen:1 match right now
#windowrule = bordercolor rgb(00ff00), tag:fullscreen_mode
windowrule = bordercolor rgb(ffc1e4), fullscreen:1
windowrule = rounding 0, fullscreen:1
# Can do bordersize 10 for a fun indicator around or something
windowrule = bordersize 0, fullscreen:1

# This section is replaced by SED from $UserScripts/FullscreenHandler.sh
#1:DYNAMIC WORKSPACE PLACEHOLDER [ns]
workspace = 1, gapsin:3, gapsout:2
#2:DYNAMIC WORKSPACE PLACEHOLDER [ns]
workspace = 2, gapsin:3, gapsout:2
#3:DYNAMIC WORKSPACE PLACEHOLDER [ns]
workspace = 3, gapsin:3, gapsout:2
#4:DYNAMIC WORKSPACE PLACEHOLDER [ns]
workspace = 4, gapsin:3, gapsout:2
#5:DYNAMIC WORKSPACE PLACEHOLDER [ns]
workspace = 5, gapsin:3, gapsout:2
#6:DYNAMIC WORKSPACE PLACEHOLDER [ns]
workspace = 6, gapsin:3, gapsout:2
#7:DYNAMIC WORKSPACE PLACEHOLDER [ns]
workspace = 7, gapsin:3, gapsout:2
#8:DYNAMIC WORKSPACE PLACEHOLDER [ns]
workspace = 8, gapsin:3, gapsout:2
#9:DYNAMIC WORKSPACE PLACEHOLDER [ns]
workspace = 9, gapsin:3, gapsout:2
#10:DYNAMIC WORKSPACE PLACEHOLDER [ns]
workspace = 10, gapsin:3, gapsout:2
Add a line in our Startup_Apps.conf: exec-once = /usr/local/bin/fullscreen-window-watcher, and voilà.
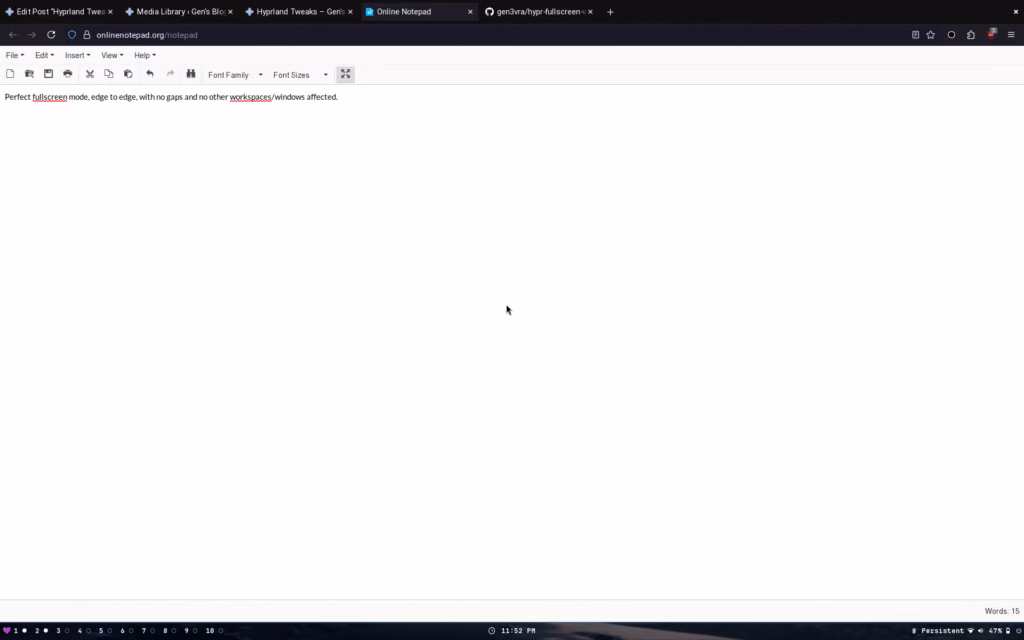
Regardless of bindings or how we achieved fullscreen, our app now has no gap or border. Additionally, tabbing to other workspaces works perfectly, and exiting the app in any way properly resets the settings. Sleek.
There are a few hidden urls on my site (/secure, /chat, /key, etc) but one I want to highlight is /pixels. This is a fun idea where the same canvas is shared by everyone who visits it, but each visitor is only able to place one pixel on the board every 30 minutes. This leads to a (hopefully) more collaborative effort or getting your friends to draw on the canvas with you.
That’s all for now. : )
It helps me if you share this post
https://rose.dev/blog/2025/07/11/rose-dev-pixels/
Using a computer generally means doing one of a few common, repeating goals: listen to music, consume media content, create, connect, or have fun. The operating system is the bridge to accomplishing those goals.
Evaluating how well an operating system performs as this bridge involves a few key points.
It offers quick, simple ways to achieve your goals
It provides privacy and security in a straightforward way
It gets out of your way
And, hopefully (though less important), it doesn’t look like trash
When the capabilities of computers were still being explored, there was a clear drive to improve every aspect of the operating system.
Now, simplicity and “not confusing the user” often takes precedence, even if it sacrifices functionality.
As a side effect, computers become less useful for everyone. Instead of encouraging users to rise to the level of what the machine can do, functionality is stripped back and lowered to the simplest possible use case. The result is a system designed for the ideal but non existent lowest common denominator.
Windows
For example, the Windows 10 update was largely marketed as an attempt to polish the UI and create a more cohesive experience. That effort failed, largely due to a lack of clear direction within the company. Updating legacy UI components or fixing outdated Control Panel links to work with the modern Settings app doesn’t generate revenue, so management simply doesn’t care. The end result was a significant loss of user privacy, a slower interface, and fewer options.
With Windows 11, it feels like we’ve regressed even further; reinventing the wheel, repeatedly, and for no gain.
Windows 11 now assumes I need a slow-loading AI Chat to help solve problems that have had reliable solutions for years. Its latest major feature, “Copilot,” is just a rebranded Bing AI chat baked into the OS. Here are the Windows Settings you can modify:
Why would I need to click, wait for Bing Chat to slowly connect to internet services, and then send off a query just to open File Explorer? “Snap my windows”? Instead of dragging a window to the edge in a fraction of a second, why would I want to ask a slow-loading chat to do it for me? Mute volume? Isn’t there already a hardware shortcut for that? If some sound is blaring and I need to mute it quickly, I’d never waste time going through the chat. I don’t need Microsoft to reinvent the wheel when it comes to changing my wallpaper or launching a troubleshooter that never works. Why can’t I ask it to create a firewall rule to block every program with ‘razer’ in its name? And why is the Control Panel still in Windows 11, two versions after they claimed they were consolidating everything into the new Settings app? It’s pure laziness.
You may have heard the term “enshittification”, referring to the process by which a company first acquires users by acting in their best interests, then shifting to serve the company’s best interests once users are hooked. This is happening with the entire culture of the internet.
It’s become a pervasive pattern across the digital landscape. Tools are no longer designed to accomplish tasks; instead, they’re built to collect data, spy on users, manipulate behavior for profit, and create addictive experiences. The result is an environment that prioritizes corporate gain over user satisfaction.
The concept of the “user” is often treated as a mythical, incompetent being that needs constant protection. While learning often comes through trial and error (by breaking things), there’s a widespread desire for a perfect, effortless solution that simply doesn’t exist. I recently read that the Signal app refuses to add any options, as outlined in their design philosophy.
Development Ideology
Truths which we believe to be self-evident:
The answer is not more options. If you feel compelled to add a preference that’s exposed to the user, it’s very possible you’ve made a wrong turn somewhere.
The user doesn’t know what a key is. We need to minimize the points at which a user is exposed to this sort of terminology as extremely as possible.
There are no power users. The idea that some users “understand” concepts better than others has proven to be, for the most part, false. If anything, “power users” are more dangerous than the rest, and we should avoid exposing dangerous functionality to them.
This sets an extremely dangerous precedent. Not only does it assume people are incapable of learning, but it also forces everyone using a computer to the same, incompetent level as the “ideal” user – the mythical stupid person. Rather than adding advanced features that could benefit users and push humanity forward, the focus shifts to making sure the app is foolproof.
This attitude has quickly spread across the digital landscape. Take Changelogs, for example. Once meant to document actual changes, they now rarely list anything concrete. These days, most update notes offer vague phrases like “Bug fixes and improvements,” with no real information. This stems partly from a condescending view of users (“they don’t need to know or wouldn’t understand the details”), and partly from the fact that most changes no longer benefit the user. Instead, they quietly push the app in a worse direction, hidden behind empty words.
Trust is a two way street. The less products trust their users, the less users trust the product.
When software is built on the assumption that users are clueless and untrustworthy, it erodes the relationship entirely. Removing options, hiding functionality, and oversimplifying interfaces signal that the product doesn’t respect the user’s intelligence or intent. In turn, users become skeptical of updates, of features, and the motives behind every change. Once that mutual trust breaks down, users stop engaging, stop exploring, and eventually stop caring.
What We Can Do
Put your energy into products that genuinely respect the user. Don’t support this growing trend of junk food tech, designed for easy consumption but empty of real value. Exercise your right to ownership fully and freely. Don’t hesitate to push back against companies that exploit your time, attention, and data without accountability. Scream as loud as you can. Seek out tools that empower rather than pacify. Support software that offers transparency, flexibility, and control, not just convenience. Change won’t come from passivity; it will come from users demanding better, choosing alternatives, and refusing to settle for less.
Alternatives
The most important thing is to stop encouraging massive corporations to make their products even more user-hostile. You can do this by seeking out alternatives and, as the saying goes, voting with your wallet. Here are a few options to start with, and there are always more out there.
Some alternatives may require learning more about your computer or adjusting your habits. That’s okay. Change doesn’t need to happen all at once. In fact, trying to cut everything off immediately will lead to frustration and burnout, making it likely you’ll give up and fall back into old patterns.
Start small. Stop paying companies that would hold a gun to your head for the next payment if it was legally allowed. Use an Adblocker (recommended by the FBI). Stop paying Google for YouTube Premium and instead use Invidious Instances and GrayJay. Stop paying for Microsoft 365 and start using LibreOffice for projects that allow it.