While customizing my desktop with fun little overlays using Hyprwinwrap, I thought it would be really cool to display shaders on top of my wallpaper. After trying and failing to find an existing program that would suit my needs, a new project idea was born.
Awesome, but maybe you want something more “interesting”. Here’s a ShaderToy converted shader called Eon:
I realized early in the project most of the fun ShaderToy projects use layering with iChannels and more than one shader. This program uses a similar structure so it’s possible to achieve advanced effects.
Cellular automata simulation
For instance, put a file named “shader0.frag/shader0.vert” next to wayshader for a basic one shader setup. If you need multipass rendering on that one shader, simply insert uniform sampler2D u_sampler0 as a variable. u_sampler0 will then contain a reference to last frame’s buffer so you can make trails, transformations, etc.
Want another layer? Easy. Add “shader1.frag/shader1.vert” next to the program. This shader will be rendered as its own pass on top of the previous shader.
The u_sampler variables are mapped to each shader’s index; u_sampler0 is always a reference to shader0‘s buffer. shader1 has access to u_sampler1, which is a reference to its own buffer. shader2 will have access to u_sampler0, u_sampler1, and u_sampler2 (its own buffer). Supports up to 32 “channels” with the same pattern.
It also provides basic inputs in the form of u_resolution, u_time, and u_frame.
Linux is a real joy compared to Windows. Finally, my computer is my own again. No more nagging ads, settings changing automatically, or random telemetry taking up valuable CPU time. Using Linux is like getting rid of that old 1961 American Rambler and finally joining modern society with an electric car.
Using Hyprland is like ditching your car for a spaceship. Not very practical for commuting, but really fun nonetheless. And, everyone stares at you whenever you land it in the grocery store parking lot, so it’s all worth it, right?
Since Hyprland is a relatively new Wayland compositor, there are a few things that bothered me when attempting to implement the experience I wanted.
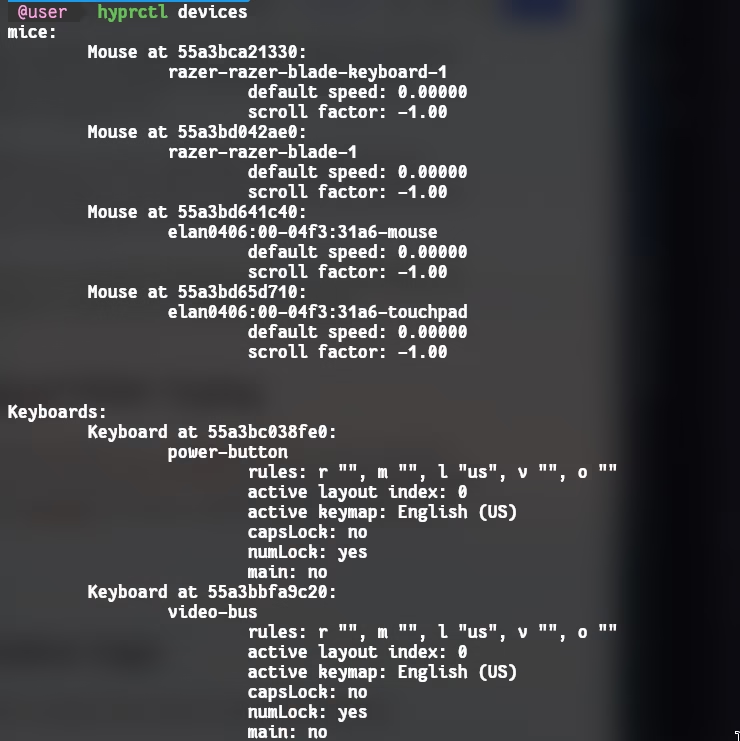
Hyprland has a built in setting (input:touchpad:disable_while_typing) to hopefully prevent palms from messing with the cursor. If you’re lucky, Hyprland thinks your touchpad is a mouse, so this setting doesn’t work at all.
hyprctl devices
We can re-implement our desired behavior:
Read input from our main keyboard
Disable the touchpad device on input
Re-enable the touchpad device after X ms have elapsed
First we’ll figure out our devices.
ls /dev/input/by-id/
There may be a few that match what we’re looking for. usb-Razer_Razer_Blade-if01-event-kbd was the one that worked in my case.
And then from the previous screenshot where we ran hyprctl devices, we’ve already discovered the touchpad is elan0406:00-04f3:31a6-touchpad.
We could choose any language to write a daemon, but I’ll pick C. It’s fast, performant, and has a tiny memory footprint. This will allow the daemon/program to sit at 0% CPU usage when idle and take up mere megabytes of our RAM.
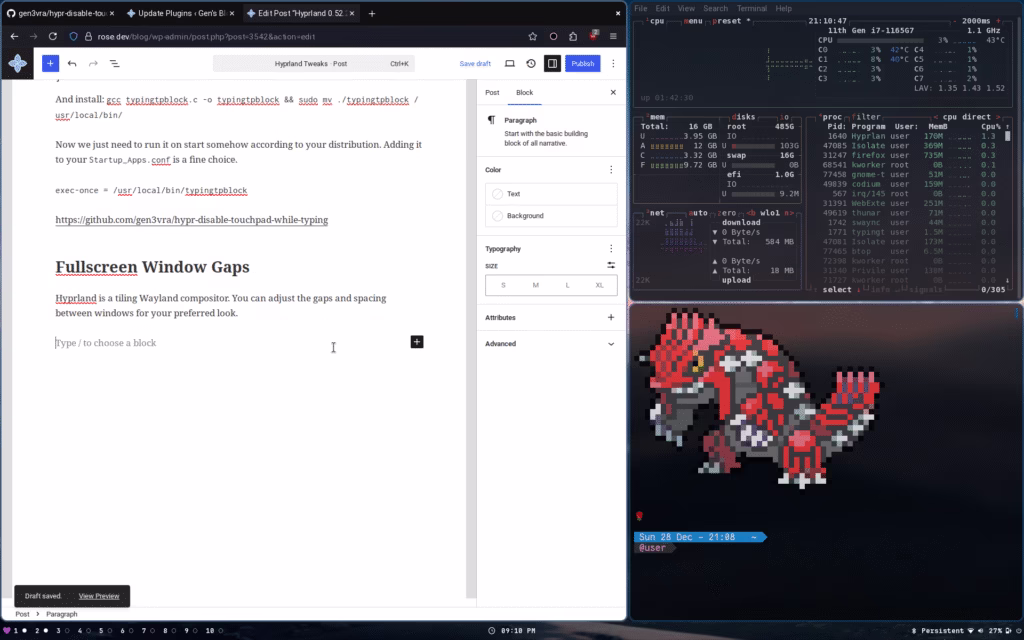
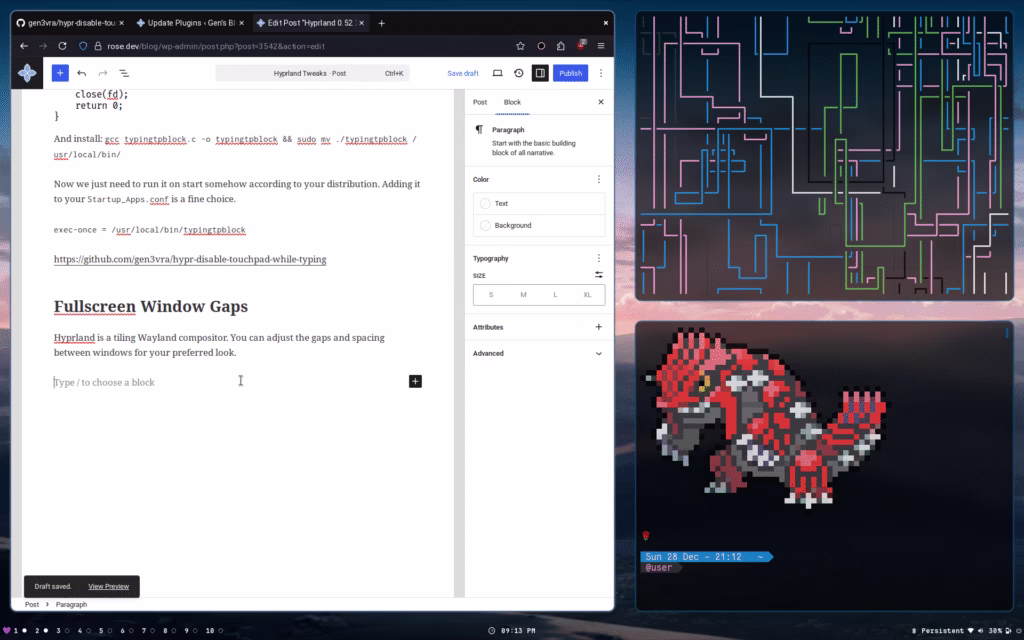
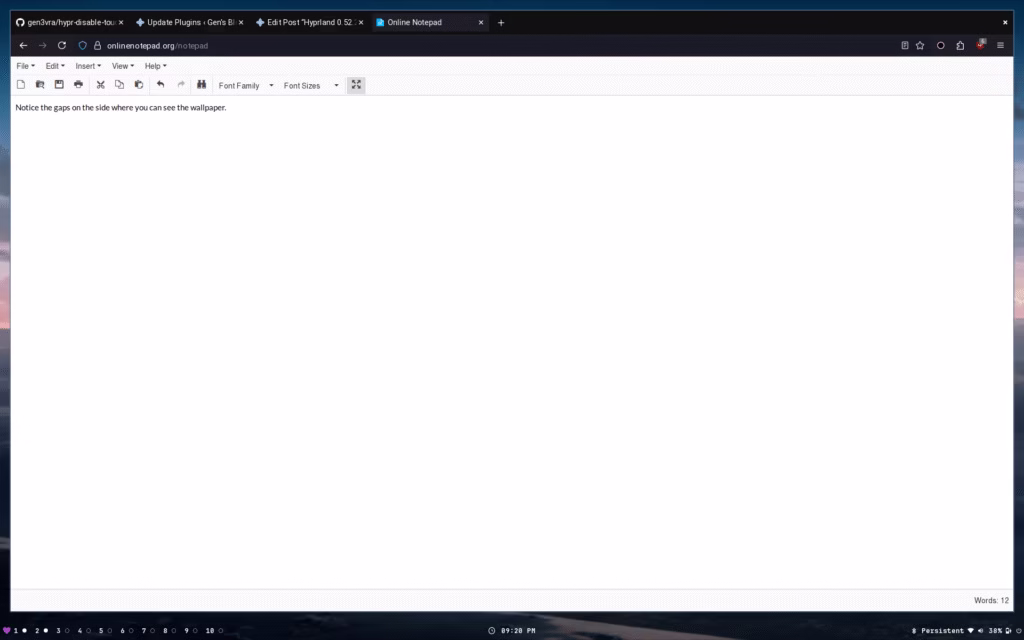
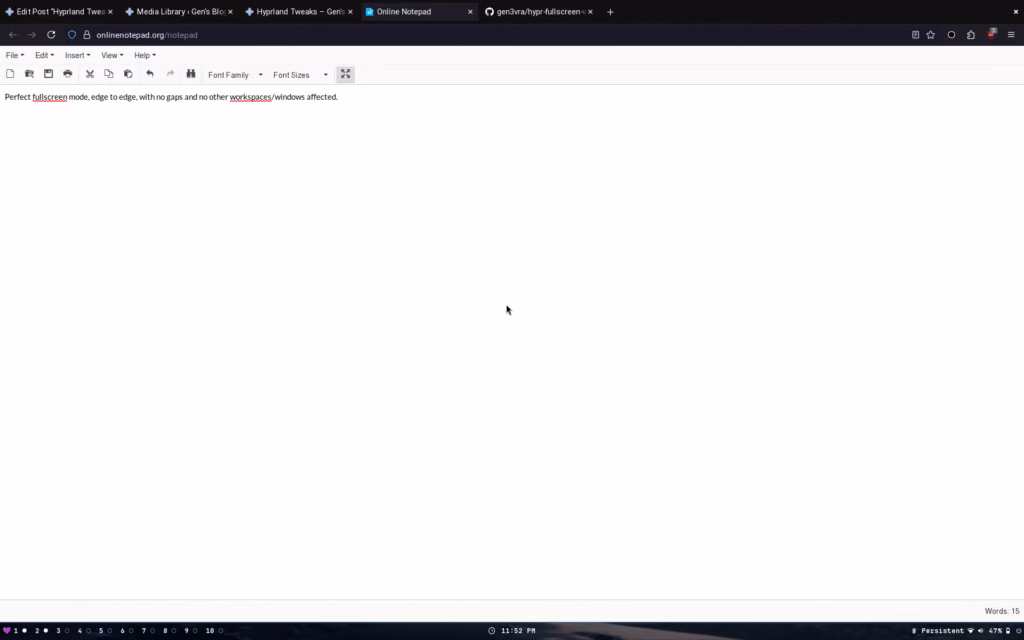
Unfortunately, when you fullscreen an application the gaps you chose will stay the same. This means no matter your gap preference, unless it’s 0, you can see behind the window.
You also have to disable rounded corners, otherwise there will be tiny gaps in all four quadrants.
Additionally, by default there’s no visual variation between a window that exists by itself on a workspace, and a fullscreen window. This can lead to confusion unless you explicitly style fullscreen windows borders differently.
We can add some configurations to our hyprland.conf to differentiate it a bit.
windowrule = bordercolor rgb(ffc1e4), fullscreen:1
windowrule = rounding 0, fullscreen:1
windowrule = bordersize 2, fullscreen:1 # or 0 for none
As stated above, if we’ve set any gap size at all, there will still be space between the fullscreen window and the screen edge. This is not ideal.
Let’s fix it. You’d think we can just do something similar to the above, right?
Wrong! These are not valid properties. You must set them in the general or workspace namespace.
Okay, so we want an application that can do the following:
Keep track of the fullscreen state
Change the configuration when fullscreen
Leave all other windows alone
We could bind a fullscreen shortcut to run a script that would both update the gap settings and toggle fullscreen for the active window. This seems fine and recommended. Unfortunately this is a bad solution, because there are way too many edge cases to handle.
Double clicking a titlebar to maximize would not trigger our solution
Maximizing, then closing the application window would not update our tracked boolean, making the next maximize do nothing until pressed twice
Maximizing, then tabbing to another workspace would mean our settings changes remain, making all normal windows have no gap
We could try to track window closes and any potential edge case, but it becomes messy and complex quickly, without solving the problem cleanly.
The solution is yet another lightweight daemon. We can track fullscreen changes directly from the compositor socket itself, ensuring we catch everything. Once we know the fullscreen state and which window specifically, it’s trivial to hand that information off to a script that handles setting changes for us.
But wait, how does this solve the problem of settings applying to all our other windows which aren’t fullscreen? The hint was mentioned above.
Hyprland has individual workspace separated settings, so you can do something like this:
workspace = 1, gapsin:3, gapsout:2
workspace = 2, gapsin:10, gapsout:10 # example
workspace = 3, gapsin:5, gapsout:12 # example
workspace = 4, gapsin:20, gapsout:9 # example
This is important because logically, if a window were fullscreened on a certain workspace, no other windows are visible. That means an individual workspace config essentially becomes that window’s config.
The last piece we need is to find out where we can get window information from. The hyprctl activewindow -j command is perfectly suitable for this.
I’m going to write the daemon in C again for the same reasons mentioned above.
#define _GNU_SOURCE
#include <errno.h>
#include <stdio.h>
#include <stdlib.h>
#include <string.h>
#include <sys/socket.h>
#include <sys/un.h>
#include <unistd.h>
#define BUF_SIZE 4096
static void tag_window(const char *addr, int add) {
  if (!addr || !addr[0])
    return;
  char cmd[512];
  int ret =
      snprintf(cmd, sizeof(cmd),
               "hyprctl dispatch tagwindow %s%sfullscreen_mode address:%s > /dev/null 2>&1",
               add ? "+" : "-- -", add ? "" : "", addr);
  if (ret < 0 || ret >= sizeof(cmd))
    return;
  system(cmd);
}
static void run_fullscreen_handler(const char *addr, int fs, int workspace) {
  if (!addr || !addr[0])
    return;
  char cmd[512];
  int ret = snprintf(
      cmd, sizeof(cmd),
      "/home/user/.config/hypr/UserScripts/FullscreenHandler.sh %s %d %d > /dev/null 2>&1",
      addr, fs, workspace);
  if (ret < 0 || ret >= sizeof(cmd))
    return;
  system(cmd);
}
static void query_active_window(void) {
  FILE *fp = popen("hyprctl activewindow -j", "r");
  if (!fp) {
    fprintf(stderr, "Failed to query active window\n");
    return;
  }
  char buf[BUF_SIZE];
  char address[128] = {0};
  int fullscreen = -1;
  int workspace = -1;
  int in_workspace = 0;
  while (fgets(buf, sizeof(buf), fp)) {
    if (strstr(buf, "\"address\"")) {
      sscanf(buf, " \"address\": \"%[^\"]\"", address);
    }
    if (strstr(buf, "\"fullscreen\"")) {
      sscanf(buf, " \"fullscreen\": %d", &fullscreen);
    }
    // Handle json workspace object
    if (strstr(buf, "\"workspace\"")) {
      in_workspace = 1;
    }
    if (in_workspace && strstr(buf, "\"id\"")) {
      sscanf(buf, " \"id\": %d", &workspace);
      in_workspace = 0;
    }
  }
  pclose(fp);
  if (fullscreen == -1 || !address[0] || workspace == -1)
    return;
  //printf("fullscreen=%d window=%s workspace=%d\n", fullscreen, address, workspace);
  //fflush(stdout);
  if (fullscreen == 1) {
    tag_window(address, 1);
  } else if (fullscreen == 0) {
    tag_window(address, 0);
  }
  run_fullscreen_handler(address, fullscreen, workspace);
}
int main(void) {
  const char *runtime = getenv("XDG_RUNTIME_DIR");
  const char *sig = getenv("HYPRLAND_INSTANCE_SIGNATURE");
  if (!runtime || !sig) {
    fprintf(stderr, "Hyprland environment not detected\n");
    return 1;
  }
  char sockpath[512];
  int ret = snprintf(sockpath, sizeof(sockpath), "%s/hypr/%s/.socket2.sock",
                     runtime, sig);
  if (ret < 0 || ret >= sizeof(sockpath)) {
    fprintf(stderr, "Socket path too long\n");
    return 1;
  }
  int fd = socket(AF_UNIX, SOCK_STREAM, 0);
  if (fd < 0) {
    perror("socket");
    return 1;
  }
  struct sockaddr_un addr = {0};
  addr.sun_family = AF_UNIX;
  strncpy(addr.sun_path, sockpath, sizeof(addr.sun_path) - 1);
  if (connect(fd, (struct sockaddr *)&addr, sizeof(addr)) < 0) {
    perror("connect");
    close(fd);
    return 1;
  }

  // Normalize workspaces
  char cmd[512];
  int resetRet = snprintf(
      cmd, sizeof(cmd),
      "/home/user/.config/hypr/UserScripts/FullscreenHandler.sh %s %d %d > /dev/null 2>&1",
      "discard", -1, -1);
  if (resetRet < 0 || resetRet >= sizeof(cmd))
    return 1;
  system(cmd);

  // Watch for changes
  char buf[BUF_SIZE];
  while (1) {
    ssize_t n = read(fd, buf, sizeof(buf) - 1);
    if (n < 0) {
      if (errno == EINTR)
        continue;
      perror("read");
      break;
    }
    if (n == 0)
      break;
    buf[n] = '\0';
    if (strstr(buf, "fullscreen>>")) {
      query_active_window();
    }
  }
  close(fd);
  return 0;
}
This program will be updated with each fullscreen change from Hyprland itself. It then passes the actual action off to FullscreenHandler.sh with the window address, fullscreen status, and workspace. It also tags the window in case we want to do any future actions, but you may omit this part without any loss of functionality.
The handler script is quite basic, and will update the actual settings.
#!/bin/bash
ADDR="$1"
FS="$2"          # 0, 1, or 2
WS="$3"          # 1-10, or -1 to reset all

# Config file to edit
HYPR_CONF="$HOME/.config/hypr/UserConfigs/UserDecorations.conf"  # adjust if needed

# Normal vs Fullscreen configuration
NO_BORDER_GAP="gapsin:0, gapsout:0"
NORMAL_BORDER_GAP="gapsin:3, gapsout:2"

if [ "$WS" -eq -1 ]; then
    for i in {1..10}; do
        LINE_TO_INSERT="workspace = ${i}, $NORMAL_BORDER_GAP"
        sed -i "/^#${i}:DYNAMIC WORKSPACE PLACEHOLDER \[ns\]/{n;s/.*/$LINE_TO_INSERT/;}" "$HYPR_CONF"
    done
    #echo "Reset all workspaces to normal padding"
    exit 0
fi

# 0 = not fs, 1 = fs, 2 = exclusive fs
if [ "$FS" -eq 1 ]; then
    LINE_TO_INSERT="workspace = ${WS}, $NO_BORDER_GAP"
else
    LINE_TO_INSERT="workspace = ${WS}, $NORMAL_BORDER_GAP"
fi

# Use sed to replace the line after the workspace comment, in-place
sed -i "/^#${WS}:DYNAMIC WORKSPACE PLACEHOLDER \[ns\]/{n;s/.*/$LINE_TO_INSERT/;}" "$HYPR_CONF"
#echo "Updated workspace $WS with $( [ $FS -eq 1 ] && echo 'no-border padding' || echo 'normal padding')"
There’s probably a better way than using sed. Regardless, if you structure a section in your UserDecorations.conf as the script expects, it will work perfectly.
## EXAMPLE ##
# You CAN use a tag but it has a few ms delay and we can handle everything needed with fullscreen:1 match right now
#windowrule = bordercolor rgb(00ff00), tag:fullscreen_mode
windowrule = bordercolor rgb(ffc1e4), fullscreen:1
windowrule = rounding 0, fullscreen:1
# Can do bordersize 10 for a fun indicator around or something
windowrule = bordersize 0, fullscreen:1

# This section is replaced by SED from $UserScripts/FullscreenHandler.sh
#1:DYNAMIC WORKSPACE PLACEHOLDER [ns]
workspace = 1, gapsin:3, gapsout:2
#2:DYNAMIC WORKSPACE PLACEHOLDER [ns]
workspace = 2, gapsin:3, gapsout:2
#3:DYNAMIC WORKSPACE PLACEHOLDER [ns]
workspace = 3, gapsin:3, gapsout:2
#4:DYNAMIC WORKSPACE PLACEHOLDER [ns]
workspace = 4, gapsin:3, gapsout:2
#5:DYNAMIC WORKSPACE PLACEHOLDER [ns]
workspace = 5, gapsin:3, gapsout:2
#6:DYNAMIC WORKSPACE PLACEHOLDER [ns]
workspace = 6, gapsin:3, gapsout:2
#7:DYNAMIC WORKSPACE PLACEHOLDER [ns]
workspace = 7, gapsin:3, gapsout:2
#8:DYNAMIC WORKSPACE PLACEHOLDER [ns]
workspace = 8, gapsin:3, gapsout:2
#9:DYNAMIC WORKSPACE PLACEHOLDER [ns]
workspace = 9, gapsin:3, gapsout:2
#10:DYNAMIC WORKSPACE PLACEHOLDER [ns]
workspace = 10, gapsin:3, gapsout:2
Add a line in our Startup_Apps.conf: exec-once = /usr/local/bin/fullscreen-window-watcher, and voilà.
Regardless of bindings or how we achieved fullscreen, our app now has no gap or border. Additionally, tabbing to other workspaces works perfectly, and exiting the app in any way properly resets the settings. Sleek.
There are a few hidden urls on my site (/secure, /chat, /key, etc) but one I want to highlight is /pixels. This is a fun idea where the same canvas is shared by everyone who visits it, but each visitor is only able to place one pixel on the board every 30 minutes. This leads to a (hopefully) more collaborative effort or getting your friends to draw on the canvas with you.
When developing software, performance is one of the most important facets, especially if targeting a platform like web/mobile.
Creating and Destroying objects requires a lot of memory and processing power relative to our other game actions, but we can reduce the impact of Instantiation in Unity by simply reusing them.
In Unity, we can do this by Instantiating all of the objects first, then storing references to them.
We will explore this concept in an example open source game I created ‘slashdot’, which also contains shaders from the last two posts.
We will begin creating the class which will actually handle our pooled objects. When working with pooled GameObjects vs simply Instantiating and Destroying them, we want to be careful of a few key concepts. Firstly, we want to disable most properties for reuse later as opposed to destructing them. Rarely you will need to create and destroy components on initialization, but the vast majority of components or the GameObject itself can be disabled and enabled.
public GameObject enemyPrefab;
public Queue<Enemy> PooledEnemies;
public List<Enemy> TrackedActiveEnemies;
Assign an enemy through the inspector. Next we will create our pools.
Creating the Objects
Call the setup function in the Awake of the class to setup the pool.
void SetupPools()
{
    for (int i = 0; i < 100; i++)
    {
        var enemy = Instantiate(enemyPrefab, Vector3.zero, Quaternion.identity);
        PooledEnemies.Add(enemy.GetComponent<Enemy>());
        enemy.SetActive(false);
    }
}
This will Instantiate all of the objects and keep a reference for us.
Using the Objects
Now, when we want to use a GameObject we can simply call our function in our class from our instance to return a GameObject for us to manipulate.
A super simple implementation might look something like the below.
If only using the <Queue> type and planning for one enemy. However, we want to use multiple enemy types. We can make our pooled enemies a list to have more flexibility. An example implementation for this logic would be an EnemyType enum that the GetEnemy function checks, like so.
public List<Enemy> PooledEnemies = new List<Enemy>();
public GameObject GetEnemy(Enemy.EnemyType enemyType)
{
    foreach (var enemy in PooledEnemies)
    {
        if (enemy.CurrentEnemyType == enemyType)
        {
            PooledEnemies.Remove(enemy);
            return enemy.gameObject;
        }
    }
}
Now we can simply use this as we would an instantiated object.
randomEnemyType = Random.Range(0, 3) == 0 ? 1 : 0;
var enemy = GetEnemy((Enemy.EnemyType)randomEnemyType);
enemy.transform.position = new Vector3(Random.Range(0,100), Random.Range(0,100), enemy.transform.position.y, 0f);
enemy.SetActive(true);
var enemyComponent = enemy.GetComponent<Enemy>();
enemyComponent.Init();
TrackedActiveEnemies.Add(enemyComponent);
Returning the Object to the Pool
We can use a function like the one below to return a used object to the pool after we are done with it.
public void RemoveEnemy(Enemy enemy)
{
    enemy.gameObject.SetActive(false);

    TrackedActiveEnemies.Remove(enemy);
    PooledEnemies.Add(enemy);
}
Simply call RemovePooledEnemy() wherever needed.
Manager.Instance.RemoveEnemy(this);
Re-using Objects
Most of the quirks that you’ll encounter from pooling GameObjects like this stem from figuring out how to reset everything nicely. Unity doesn’t run most code on disabled objects; it’s usually preferable to reset things on Init to avoid unexpected behavior.
I recently saw these UI effects in a game called Cult of the Lamb and they were very satisfying to watch. Let’s learn how to create our own types of effects like these.
We want to begin with a base shader to manipulate, so let’s start by displaying a sprite.
Our shader must expose it to the editor in order to set our texture. Add a line under our properties defining a main texture.
_MainTex ("Base (RGB) Trans (A)", 2D) = "white" {}
And the variable under SubShader.
sampler2D _MainTex;
float4 _MainTex_ST;
The _ST value will contain the tiling and offset fields for the material texture properties. This information is passed into our shader in the format we specified.
We want to add some movement and distortion to our sprite. Begin with movement.
How can we manipulate our shader pixels? Let’s show an example by modifying our main texture. We’ll simply change the position. To do so, we can do something simple like shifting the texture coordinate down and to the left.
If you examine your sprite at this point, you may notice some odd distortion as it moves.
Set your sprite’s import settings correctly! Mesh Type: Full Rect Wrap Mode: Repeat
Once you ensure your sprite has the correct import settings, it’s time to introduce our final 2d sprite we want to manipulate with the shader to achieve our effect.
This image will greatly change the shader appearance, and you should try different gradients and patterns. Here’s my image scaled up:
But I recommend using the smallest resolution that looks good for your project due to memory and performance.
yes it’s that small (12×12)
We also need a seamless noise texture, for the distortion.
Let’s add another variable for it.
_NoiseTex ("Base (RGB) Trans (A)", 2D) = "white" {}
Once we’ve assigned our noise texture, it’s time to start moving it.
Shaders can be a useful way to enhance the visual presentation of your project through subtle or otherwise effects. Beyond code, the engine provides a built in visual scripting tool to create shaders from version 2019 onwards.
We will create an effect that allows us to highlight the player and obscure the rest of our stage. With scripting, we can also modify our exposed shader properties to adjust the intensity of the transparency effect, and transition to having no highlight. Examples will be shown later in the post.
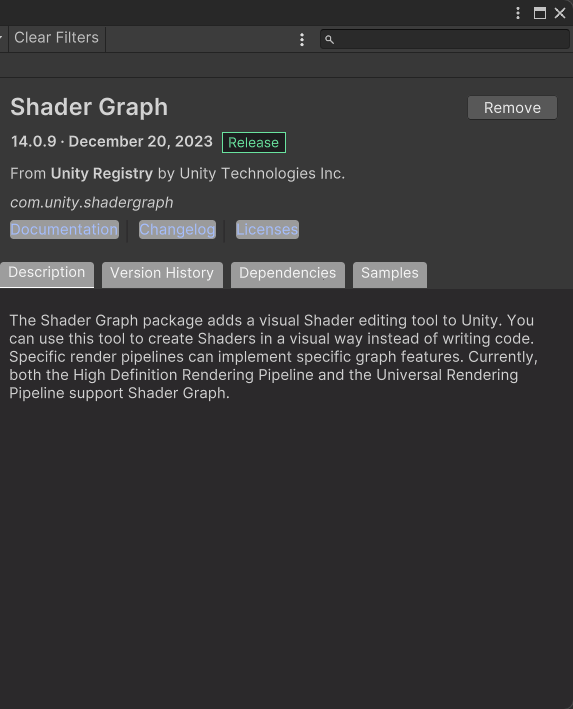
Prerequisites
Ensure you have the Shader Graph package installed in your version of Unity. I am using 2022.3.17f for this post.
Creating the Shader
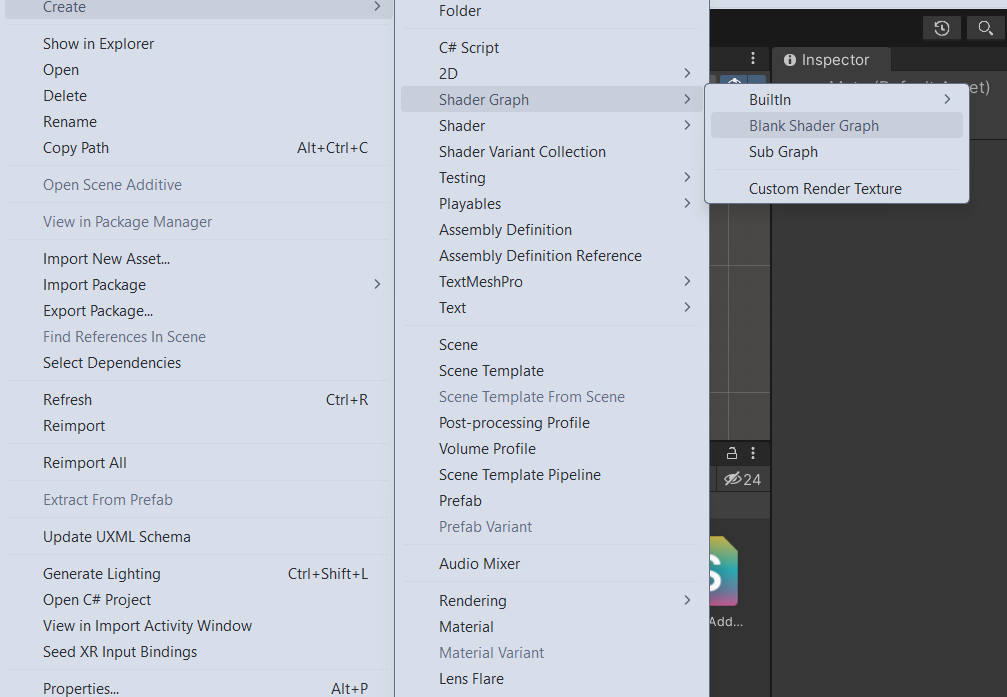
Right click in your Unity Project and do Create > Shader Graph > Blank Shader Graph
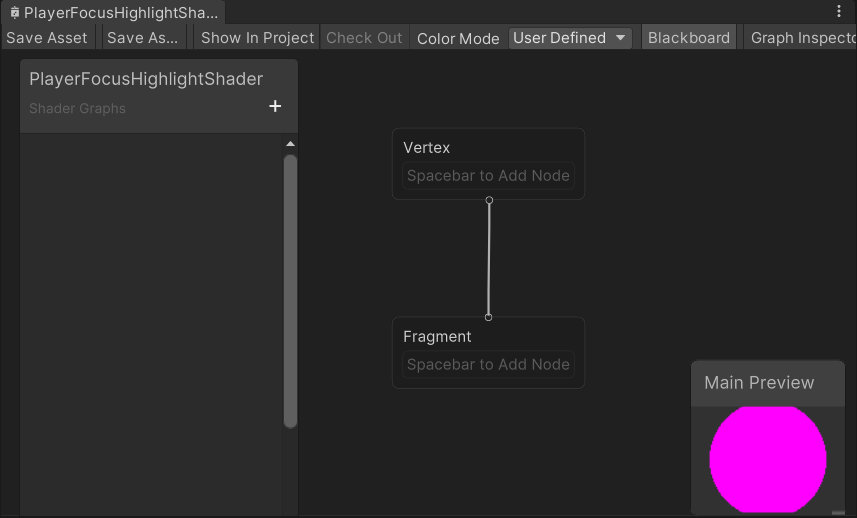
Now that we have a Shader Graph file, simply open the editor by double clicking it.
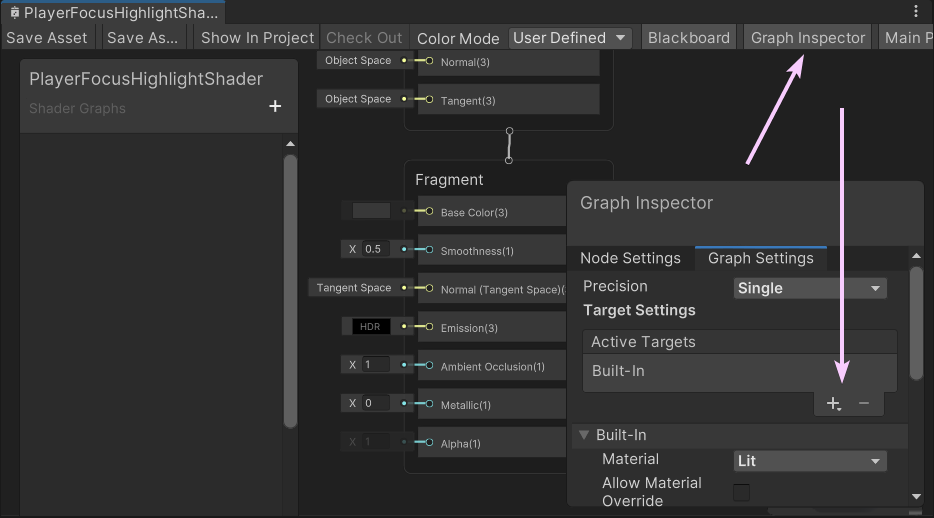
Let’s add some basic shader properties first. Navigate to the Graph Settings and add Built In as a target. We want the ability to control the transparency of our pixels, so also add the Alpha property to our fragment.
In order to properly utilize the Alpha property, we will need to edit the Built In settings Surface Type to Transparent.
Shader Inputs
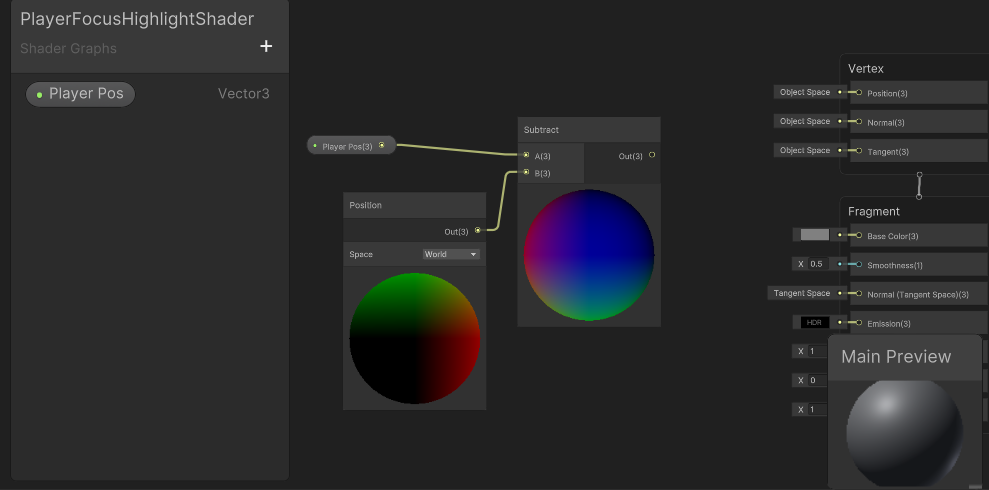
The first thing to consider is the Player’s world position. Since we want the highlight effect to follow the player, we’ll need some sort of input into the shader.
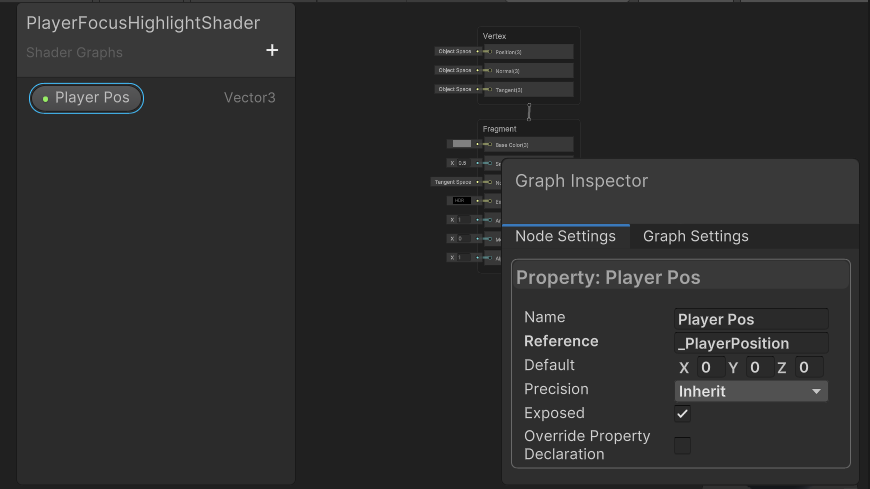
In the Shader Graph editor, ensure the ‘Blackboard’ option is checked and visible, then click the plus button on the left side of the editor to create an input variable. Make it a Vector3 category. The ‘Name’ is for visual purposes, and the ‘Reference’ field will allow scripts access to the property. Give that some value like “_PlayerPosition” and drag it into the stage.
Since that’s simply a Vector, we need to translate that into something usable for our shader. We need to subtract the input player position from our world position so we can get the individual area to affect.
Right click, and create a Position and Subtract node.
Connect the player position and world position node to the subtract node. At this point your graph should look similar to below.
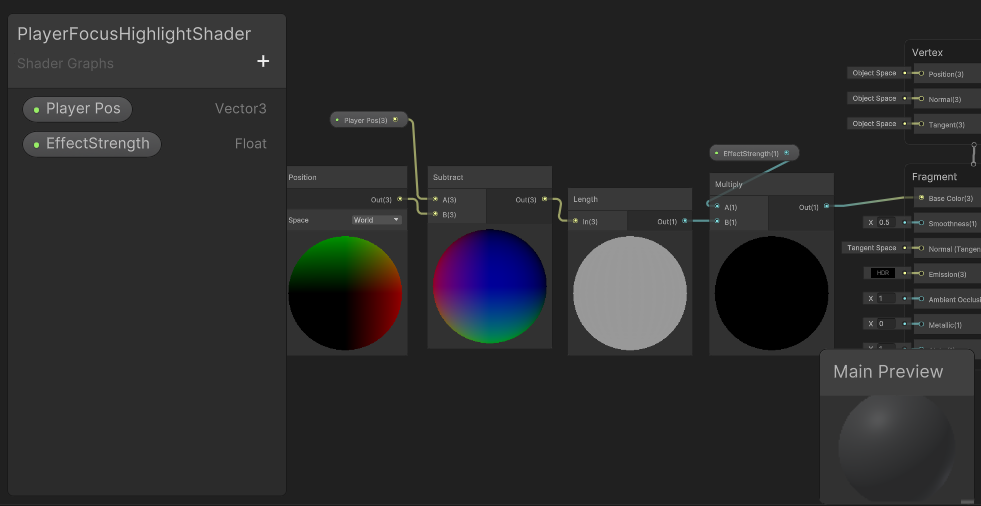
Next we will need a Length node to translate our position into a distance.
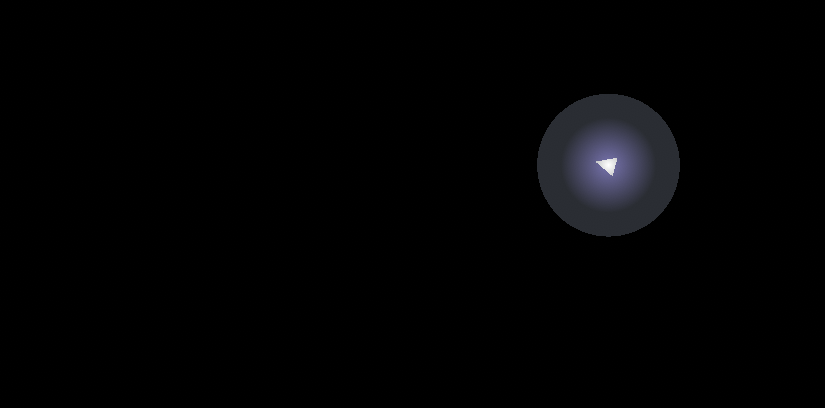
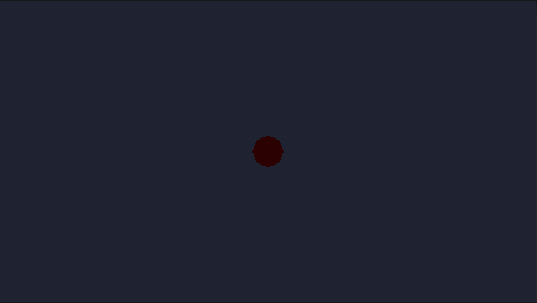
At this point, if we connect the output of our length to our Base Color on our Fragment, we can see a strange divine light.
How can we control the actual effect size?
We need a multiply node and some additional input here to control the highlight amount.
Let’s create a new Multiply node, and a Float input.
Name the Float input something like _EffectStrength, and feed the length output into the new multiply node.
You should have something similar to this, and the shader will go black again. This is simply because we haven’t given it an effect strength yet.
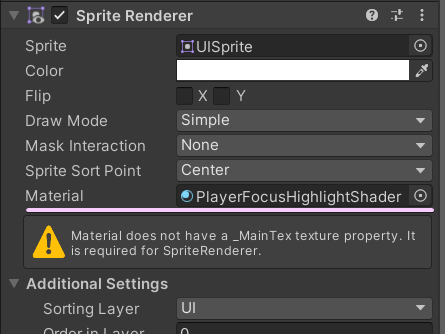
Save this Shader Graph asset and assign it to an object in our scene if you haven’t already.
Notice the warning. This refers to the fact that we aren’t rendering a sprite. This is correct, and can be safely ignored.
Assuming a reference to the sprite renderer component, we can then use the material set property functions to pass along our game values in an Update function or whenever needed.
Set the effect to something visible like 1 for now. We can also set a default through the Shader Graph editor.
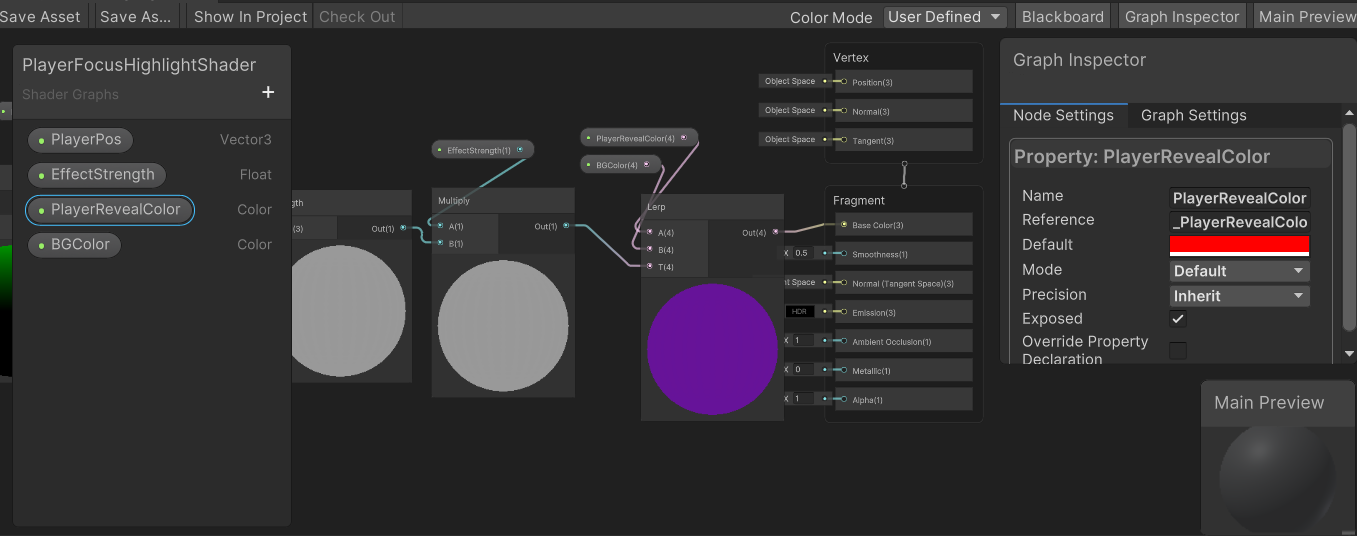
All of this grey is pretty boring, so let’s add some color. The ability to edit our colors through scripting is pretty important, so let’s create two new Color variables.
The shader will lerp between these two colors for the highlight effect. We could use only one color considering our goal of mixing the effect with transparency, but the additional color gives more control over the effect appearance.
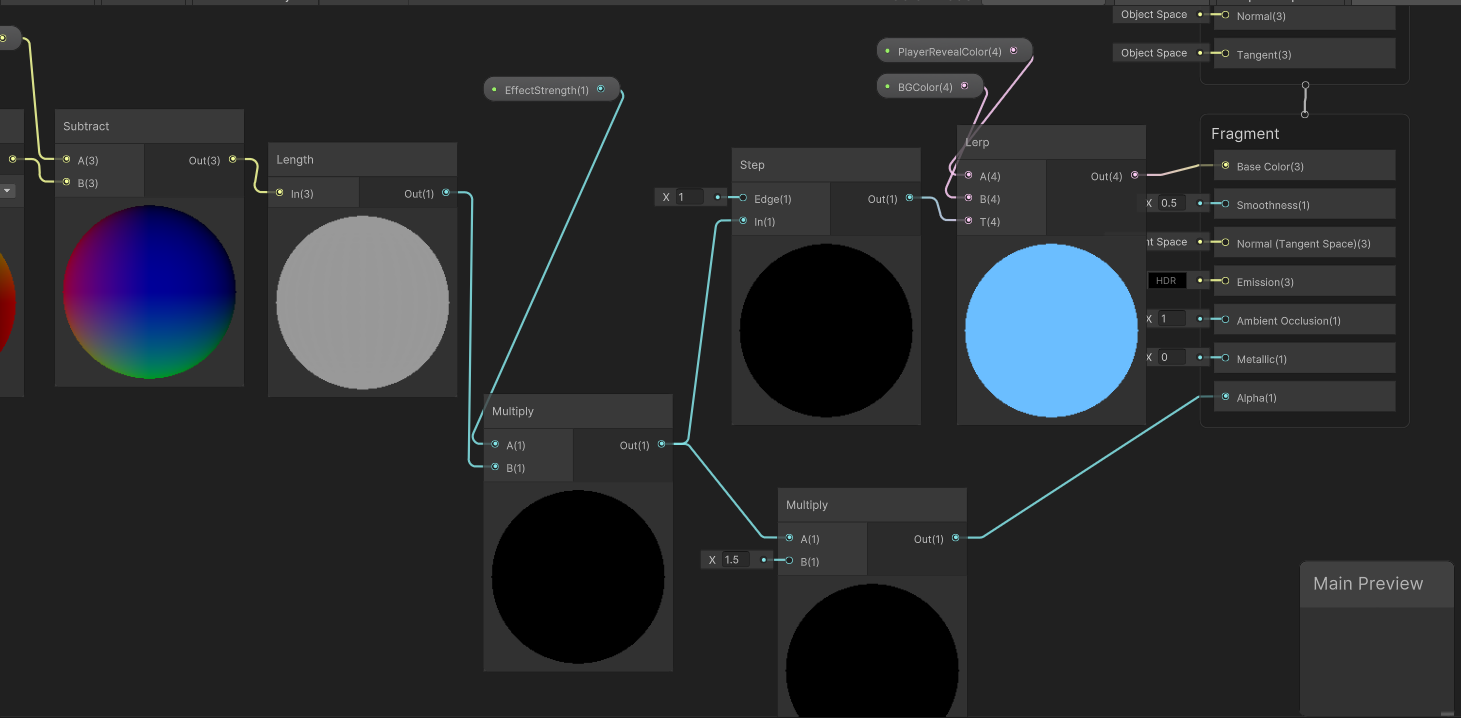
Create a Lerp node. Connect the output of the previous multiply node to the lerp T input, and the two new colors to the A and B inputs, respectively.
I set BGColor to blue, and PlayerRevealColor to red through the graph inspector to clearly show the shader effect.
If all goes well, you should have a circular gradient in the input colors you’ve specified.
And something like this in your Shader Graph.
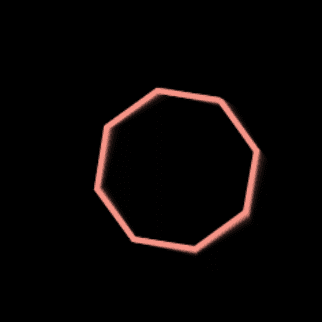
That gradient isn’t really the look we want. Instead, we want a tight circular highlight around the player position.
To achieve this, we can add a Step node.
Insert it between the multiply and lerp node at the end, and it will produce a gated circular output.
Adjusting the EffectStrength should make the circle appear larger. Try values from 0 -> 1. Above 1 will make the highlight smaller.
EffectStrength at 0.5
EffectStrength at 0
Now we just need to connect our transparency logic.
Add another Multiply node that we will use for the Alpha property on the Fragment. The input should be our previous multiply node’s output, before the Step node. This allows control over the strength of the highlight fade. I went with 1.5.
You’re pretty much finished!
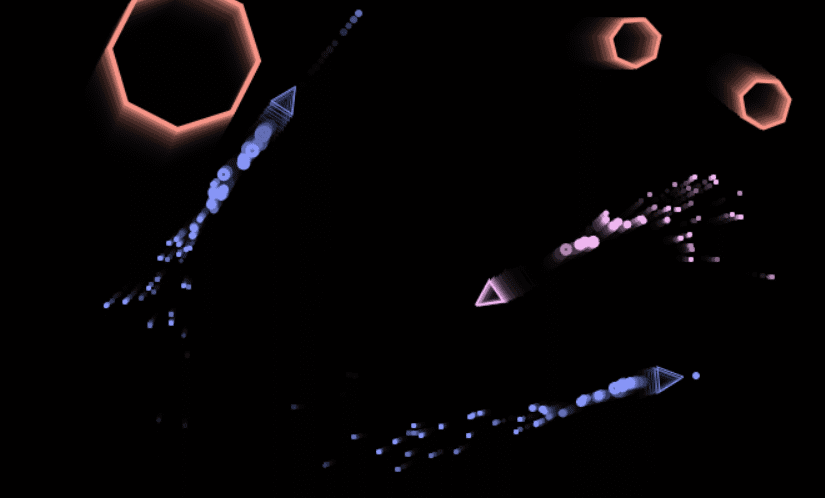
We can adjust the colors to do screen wave effects like this that could be enhanced with particle effects.
Or as a game over effect where you hide the rest of the stage and highlight the player. I added a purple background sprite behind the player to show the masking effect.
Force fields, lights for dark mazes etc all follow a similar concept.
There are many acceptable JavaScript game engines out nowadays, but often you can get good performance from writing your own simple engine or renderer depending on your use case. The code for this project will be on my GitHub linked below.
What goes into writing a game engine?
Ideally, we want to handle a few important things.
States, whether that be states of objects (alive, dead, moving, the type of enemy)
We approach this task with an object-oriented mindset instead of a functional programming mindset. Although there are a few global variables such as the overall running game state or the object pool arrays, most of the memory or information we need to remember occurs on a per-object basis.
We will be using a ‘Canvas‘ to draw our simple asteroid graphics. Writing a 3d renderer in JS is a much more complex task, although libraries like threeJS exist to get you started.
To begin with, we want to define a Vector2D class that we can reuse throughout our game. I’m familiar with Unity so I imagine an implementation similar to their engine’s GameObject setup, but any class that can read / write an X and Y will work.
This will allow us to reference positions easier. It’s vital to implement a few capabilities for our renderer. One important need is to be able to draw an object to our canvas at a specified position, and have the capability to clear said canvas, preparing for the next frame the game renders.
To draw a line, we can write JavaScript such as:
var c = document.getElementById("canvas");
var ctx = c.getContext("2d");
ctx.moveTo(0, 0);
ctx.lineTo(200, 100);
ctx.stroke();
And if we wanted to clear our canvas, we can use clearRect:
ctx.clearRect(0, 0, canvas.width, canvas.height);
We can define a render function to handle our different objects.
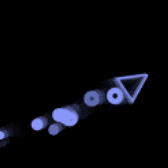
We are handling rendering and state management from inside an object now. All that just for a triangle.
We aren’t done yet. Next we need to handle Input. The goal with creating object classes is reusability and extensibility. We don’t need to spawn multiple instances of an input, so we can handle that globally. Your Input function may look something like this:
window.onkeydown = function(e) {
    switch (e.keyCode) {
        //key A or LEFT
        case 65:
        case 37:
            keyLeft = true;
            break;
            //key W or UP
        case 87:
        case 38:
            keyUp = true;
            break;
            //key D or RIGHT
        case 68:
        case 39:
            keyRight = true;
            break;
            //key S or DOWN
        case 83:
        case 40:
            keyDown = true;
            break;
            //key Space
        case 32:
        case 75:
            keySpace = true;
            break;
            //key Shift
        case 16:
            keyShift = true;
            break;
    }

    e.preventDefault();
};

window.onkeyup = function(e) {
    switch (e.keyCode) {
        //key A or LEFT
        case 65:
        case 37:
            keyLeft = false;
            break;
            //key W or UP
        case 87:
        case 38:
            keyUp = false;
            break;
            //key D or RIGHT
        case 68:
        case 39:
            keyRight = false;
            break;
            //key S or DOWN
        case 83:
        case 40:
            keyDown = false;
            break;
            //key Space
        case 75:
        case 32:
            keySpace = false;
            break;
            //key Shift
        case 16:
            keyShift = false;
            break;
    }

    e.preventDefault();
};
e.preventDefault() will stop users from accidentally hitting keys such as ctrl + L and losing focus from the window, or jumping the page with Space, for instance.
function updateShip() {
    ship.update();

    if (ship.hasDied) return;

    if (keySpace) ship.shoot();
    if (keyLeft && keyShift) ship.angle -= 0.1;
    else if (keyLeft) ship.angle -= 0.05;
    if (keyRight && keyShift) ship.angle += 0.1;
    else if (keyRight) ship.angle += 0.05;

    if (keyUp) {
        ship.thrust.setLength(0.1);
        ship.thrust.setAngle(ship.angle);
    } else {
        ship.vel.mul(0.94);
        ship.thrust.setLength(0);
    }

    if (ship.pos.getX() > screenWidth) ship.pos.setX(0);
    else if (ship.pos.getX() < 0) ship.pos.setX(screenWidth);

    if (ship.pos.getY() > screenHeight) ship.pos.setY(0);
    else if (ship.pos.getY() < 0) ship.pos.setY(screenHeight);
}

...etc

function checkDistanceCollision(obj1, obj2) {
    var vx = obj1.pos.getX() - obj2.pos.getX();
    var vy = obj1.pos.getY() - obj2.pos.getY();
    var vec = Vec2D.create(vx, vy);

    if (vec.getLength() < obj1.radius + obj2.radius) {
        return true;
    }

    return false;
}

...etc
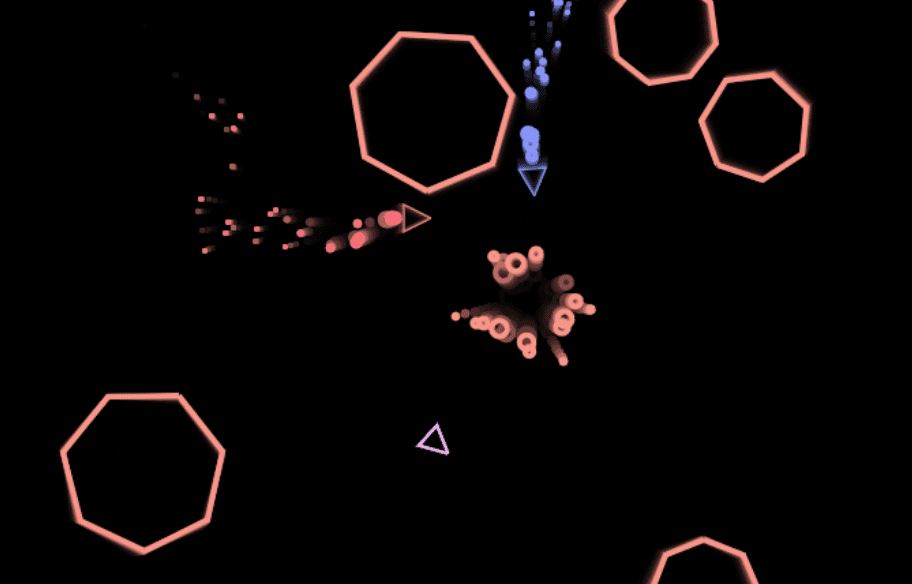
Once we have the ability to render a reusable object to a canvas and read / write a position that can be checked, we use that as a template to create other objects (particles, asteroids, other ships).
You can make interesting graphics with just basic shapes. We handle collision by assigning either an xWidth and yWidth + xOffset and yOffset, OR a radius. This again would be assigned to the object itself to keep track of.
Further Techniques
If we can control the rendering manually we can leave an ‘afterimage’ on our canvas before rendering the next frame as opposed to clearing it entirely. To do this, we can manipulate the canvas’ global alpha.
// Get the canvas element and its 2D rendering context
const canvas = document.getElementById('myCanvas');
const ctx = canvas.getContext('2d');
// Set the initial alpha value
let alpha = 0.1; // You can adjust this value to control the fading speed
// Function to create the afterimage effect
function createAfterimage() {
    // Set a semi-transparent color for the shapes
    ctx.fillStyle = `rgba(255, 255, 255, ${alpha})`;
    // Fill a rectangle covering the entire canvas
    ctx.fillRect(0, 0, canvas.width, canvas.height);
    // Decrease alpha for the next frame
    alpha *= 0.9; // You can adjust this multiplier for a different fade rate
    // Request animation frame to update
    requestAnimationFrame(createAfterimage);
}
// Call the function to start creating the afterimage effect
createAfterimage();
And a simple localStorage can be used to save scores.
function checkLocalScores() {
    if (localStorage.getItem("rocks") != null) {
        visualRocks = localStorage.getItem("rocks");
    }
    if (localStorage.getItem("deaths") != null) {
        visualDeaths = localStorage.getItem("deaths");
    }
    if (localStorage.getItem("enemyShips") != null) {
        visualEnemyShips = localStorage.getItem("enemyShips");
    }
    updateVisualStats();
}
function saveLocalScores() {
    localStorage.setItem("rocks", visualRocks);
    localStorage.setItem("deaths", visualDeaths);
    localStorage.setItem("enemyShips", visualEnemyShips);
}