Applying custom Windows styles to Firefox, Chrome, and other Chromium browser’s window buttons in Windows 10 & 11

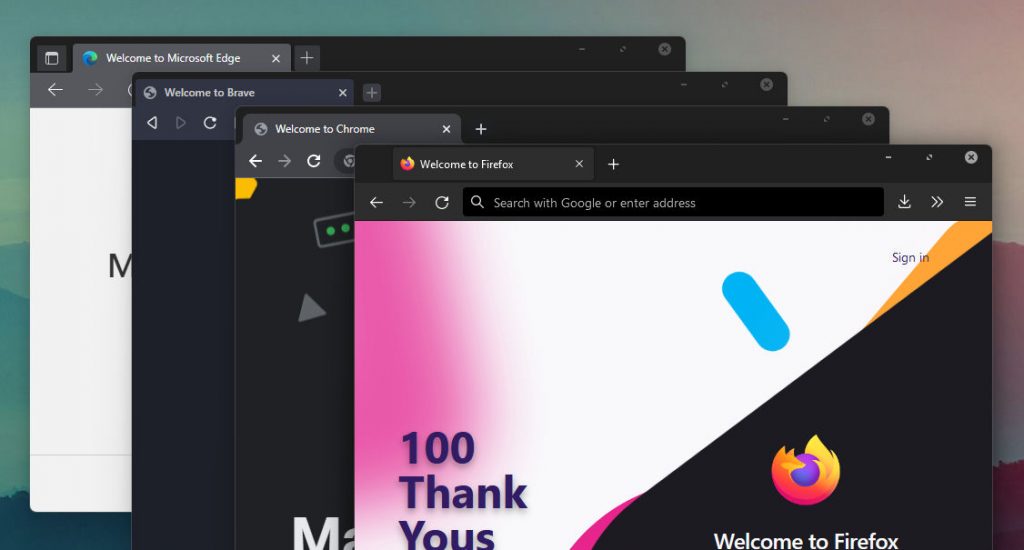
Typically, browser vendors force default button styles onto the program. This can be troublesome when you use something like SecureUxTheme to change your Windows styles, and you care about the cohesiveness. There is a hacky solution, even if the Firefox forums told me there wasn’t. 😉

DEFAULT: Custom themed Notepad next to standard browsers

For Google Chrome, Edge, Brave, and some other Chromium-based browsers

For Chromium based browsers you can simply change the shortcut target to allow launching with your custom changes.

  1. Open start menu.
  2. Search and find your browser shortcut
  3. Right-click, and open file location
  4. Right click > open Properties of the browser shortcut (The shortcut for Chrome in the Start Menu may be found in C:\ProgramData\Microsoft\Windows\Start Menu\Programs)
  5. Add this line --disable-windows10-custom-titlebar to the end of the Target field after a space. (For Chrome, “C:\Program Files\Google\Chrome\Application\chrome.exe” becomes “C:\Program Files\Google\Chrome\Application\chrome.exe” –disable-windows10-custom-titlebar )
  6. In order for your changes to show up you may need to use Task Manager (ctrl + shift + esc) and kill all background processes of that browser
  7. Repeat for each browser shortcut you use.

Changing the Registry Launch settings

This is all well and good but what if you click on a link and the browser opens automatically? Now we aren’t using the custom launch option anymore. We can edit the registry to fix this.

This is the “I’m not responsible if you break your computer” warning: BE SURE TO ALWAYS MAKE A BACKUP OF THE REGISTRY BEFORE PERFORMING ANY CHANGES.

  1. Launch the Registry Editor (Win + R, regedit)
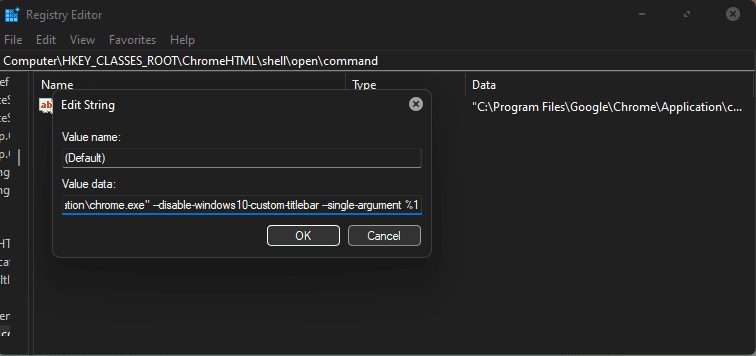
  2. Navigate to Computer\HKEY_CLASSES_ROOT\ChromeHTML\shell\open\command
  3. Change the (Default) value from "C:\Program Files\Google\Chrome\Application\chrome.exe" --single-argument %1 to "C:\Program Files\Google\Chrome\Application\chrome.exe" --disable-windows10-custom-titlebar --single-argument %1
    • We are essentially just adding that custom launch argument onto the default launch arguments Windows calls when it opens the program
  4. Starting the browser now use your themed settings. Older versions Chromium may have a different startup option. Try --disable-features=Windows10CustomTitlebar if it doesn’t work for you

Firefox

Firefox needs CSS and changing an internal flag in order to work.

  1. Open your Firefox profile. You can find it in %appdata%\Mozilla\Firefox\Profiles, try looking at the one most recently modified.
  2. If the folder doesn’t exist already, create a folder called ‘chrome‘. Yes, this is the tutorial for Firefox.
  3. Inside the ‘chrome‘ folder in your profile, create or edit the file ‘userChrome.css‘.
  4. Put these contents (or embedded down below) into the css file, either on its own or adding to what is already there. You can modify anything you want, such as the ‘titlebar-button:hover’ alpha value to your liking.
  5. Open a new Firefox window
  6. Enter about:config into the URL bar, and bypass the warning
  7. Change the toolkit. legacyUserProfileCustomizations. stylesheets option to true by double clicking.
  8. Restart Firefox
@namespace xul url("http://www.mozilla.org/keymaster/gatekeeper/there.is.only.xul");
@namespace html url("http://www.w3.org/1999/xhtml");
.titlebar-button {
background-color: transparent !important;
transition: background-color 0.5s ease;
height: 0px;
}
.titlebar-button>.toolbarbutton-icon {
list-style-image: none;
}
.titlebar-button:hover {
background-color: rgba(121, 121, 121, 0.1) !important;
}
#titlebar-close:hover {
background-color: rgba(121, 121, 121, 0.1) !important;
}
#titlebar-close:hover>.toolbarbutton-icon {
list-style-image: url("chrome://browser/skin/caption-buttons.svg#close-white") !important;
}
#main-window {
-moz-appearance: -moz-win-glass !important;
background: transparent !important;
}
#navigator-toolbox {
background: transparent !important
}
view raw userChrome.css hosted with ❤ by GitHub

And finally, get my better dark theme for Firefox. 🙂


Now your browser buttons look sleek and uniform, just like the rest of your system.


It helps me if you share this post

Published 2022-07-31 09:03:00

Realtime Priority: Ask and you will receive

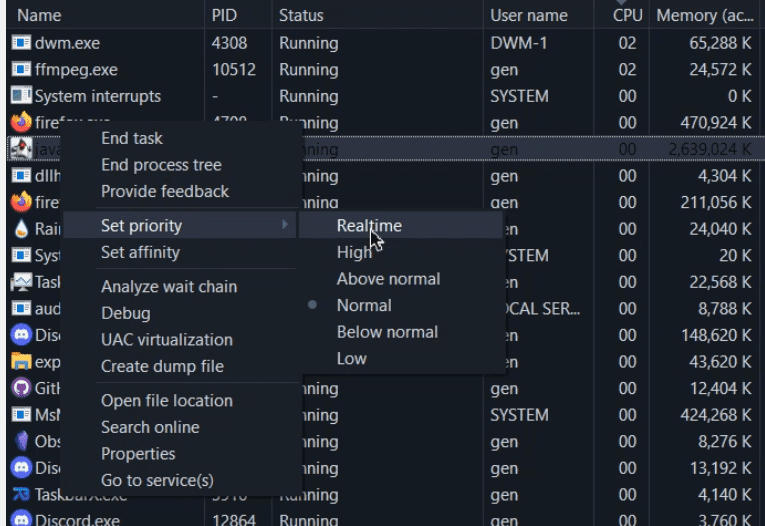
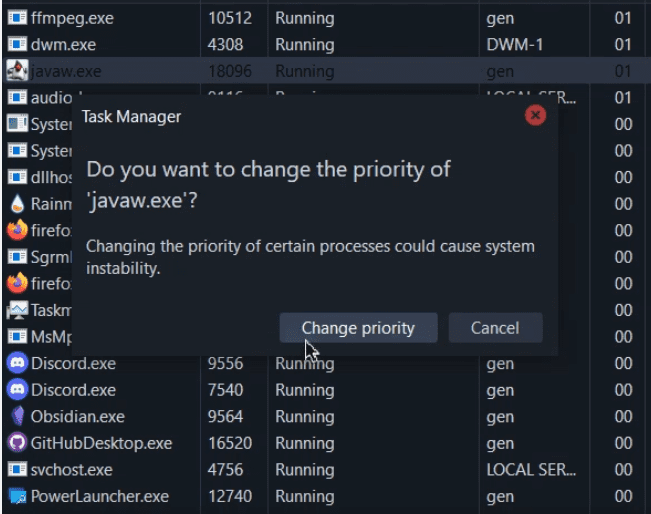
At some point when looking through Task Manager you may notice the ‘priority’ setting in Task Manager and decide that you want your favorite game (example: Minecraft) to run faster. You right click the process in Task Manager and set the priority to ‘realtime’, the highest setting.
realtime priority preview

However, upon clicking that option, a scary looking dialogue option pops up informing you that this is probably a bad move.
realtime priority warning

Changing the priority in this instance causes our laptop mouse to lag across the screen and explorer.exe to stop responding. Fun! Why is this the case? What’s going on here?

Realtime priority is the absolute highest priority you can set a program. This tells Windows you want to dedicate as much CPU time as possible to that process, so basic process like mouse input and Windows UI start competing for CPU cycles.

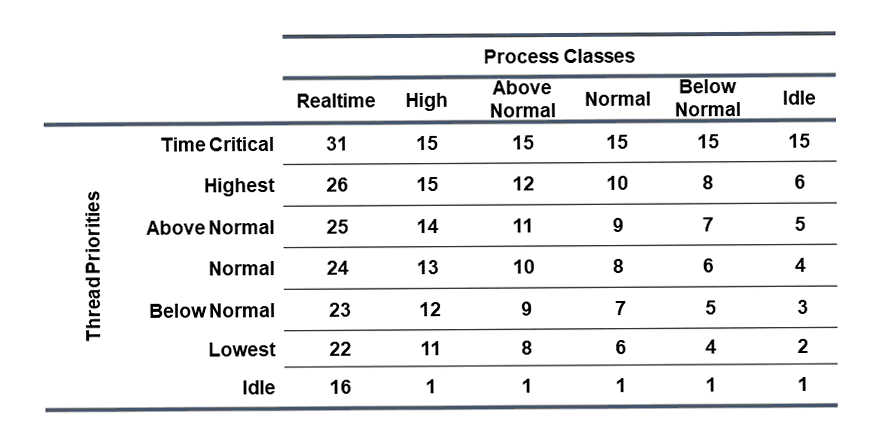
Realtime is the highest process class

This doesn’t lead to locking the system entirely because most programs don’t actually use 100% of the CPU regardless of their priority. Most threads do wait for things sometimes, and that could include waiting for a read/write to complete, or some other thread to indicate that they don’t have to wait any more. Additionally, “real-time priority” as a term actually consists of a range of priorities, as indicated by the table above. It’s possible for one “real-time” process to have higher priorities than those of another “real-time” process.

Most of the time, there’s no real reason to change process priority, although a few times it has been personally helpful in situations where two programs are working on a CPU intensive task, and they are slowing each other down. It’s possible to set the program’s process priority to “Above normal” pretty safely, allowing the CPU to dedicate more time to it.


It helps me if you share this post

Published 2022-07-24 05:03:48

Undertale Mobile Native Android Build with Controller & Keyboard Support + Save Editor

What the heck?” I hear yourself asking.

“Is there even an android version of the game out?” No. 🙂

Undertale has been one of the most influential and one of my favorite games of all time. Since the game’s release in 2015 I’ve been entranced by its secrets and storyline. I played it blind when it first came out and have been hooked ever since.

I’ve been a part of a few different Undertale data mining communities over the years and although I admit there probably aren’t any secrets left, I’m still interested in any new theories or fan works/mods.

I came across a method to patch gamemaker files including Undertale to mobile, and then discovered there’s already been some work in the community into this area. I took the existing mobile Undertale modifications online and added full controller and keyboard support (note this build is Android only). YOU CAN HIDE THE ADDED GAMEPAD IN THE GAME’S BUILT IN SETTINGS MENU. SET THE BUTTON OPACITY TO 0. ❤️

A save editor has also been added into the game. If you visit the SETTINGS menu from either the beginning of the game or the Continue menu, you can overwrite your save file with presets. Save file preset names are below, but THEY CONTAIN SPOILERS (if you haven’t somehow heard/played UNDERTALE already)

This along with the added Bluetooth controller support should make it bearable to play Undertale on mobile devices!

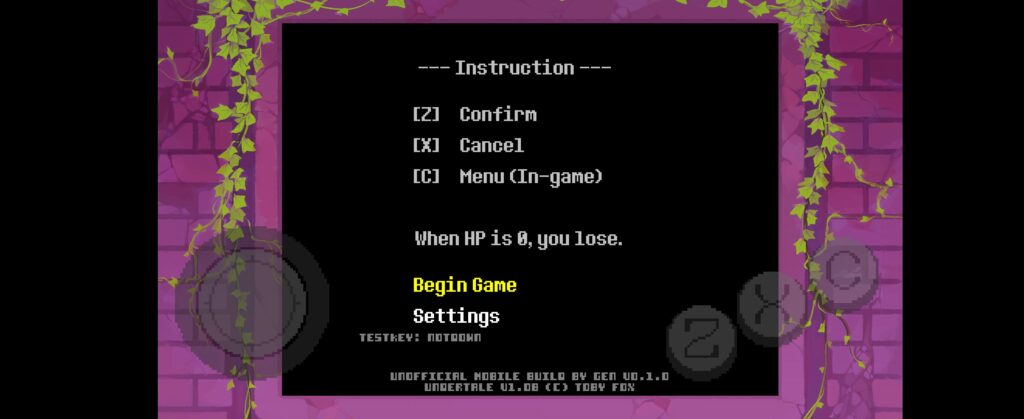
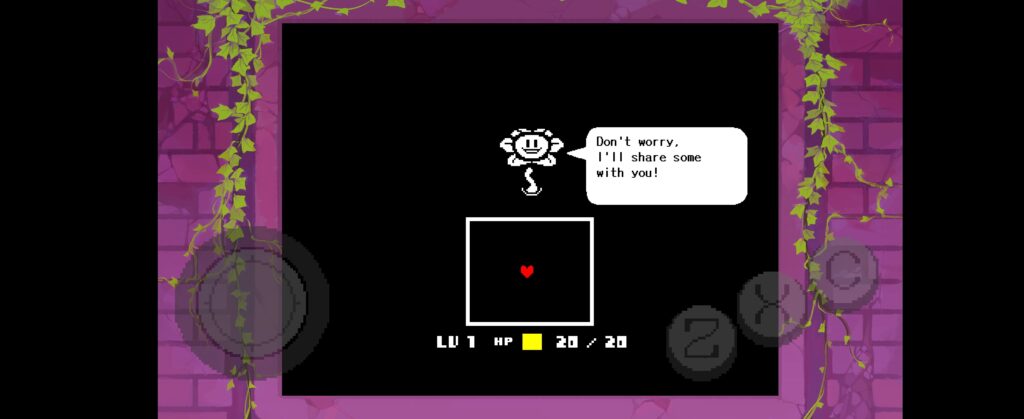
Screenshots

This build is for educational purposes and Undertale research only.


Download

v0.1.0
– Updated internal Undertale version to v1.08
– Fixed name selection screen crash
– Add more name easter eggs
– Fix save editor crash
DOWNLOAD: [APK FILE FOR ANDROID ONLY]

v0.0.8
– Initial test
[download removed]


It helps me if you share this post

Published 2022-06-17 07:39:00

Mass Discord Message Remover / Deleter Script – Remove Lots of Instant Messages

With this script, you can automate the removal of a massive quantity of discord messages (everything back to a channel’s origin, if wanted), including in personal channels. I used it personally to delete a conversation with over a year of messages. There were no problems after the proper modifications.

You will need Tampermonkey. This is an extension for your favorite browser that will allow you to run custom JavaScript.


Next, visit the delete discord messages repository. You will need to click the ‘userscript.js‘ file listed upon visiting the url. Copy everything (CTRL + A / CTRL + C) and install it. The script obviously does nothing malicious but you can also take this opportunity to verify for yourself.

To use, click the trash can icon in the channel or DM you want to delete and press “START”.

You can also add a ‘before message id’ or ‘after message id’ to control how much you delete.

The script will try to respect Discord’s limits as much as possible, backing off as necessary when Discord errors. I cannot promise you will not be banned for selfbotting or something, but I have used it many times and my account is fine. Just to be safe you shouldn’t be doing anything else on your account while the script is deleting (it will also slow down and cause problems anyway). AFAIK this doesn’t violate anything in terms of service but use at your own risk, as always.


It helps me if you share this post

Published 2022-03-06 20:55:47

Adding “Open command window here” context menu in Windows 10 to the right click menu, restoring cmd

Simply download whichever option flavor you prefer and run it. You may need to restart explorer to see your changes. The files are zipped up .reg files.


Choose an option to download

ADD TO RIGHT CLICKSHIFT + RIGHT CLICKREMOVE/UNINSTALL
You should always verify any files you download/run from strangers on the internet.

Since .reg files are basically .txt files containing paths of where to insert registry entries, you can easily open any of the downloaded files in a text editor and verify the contents are benign for yourself.


It helps me if you share this post

Published 2022-03-06 02:44:52

Easiest way to download YouTube videos and convert them to any format including .mp3 in 2022

Methods of downloading YouTube videos have changed over the years. Here are two of my preferred methods for doing so in 2022.

tl;dr: easy:

Use a Youtube-Mp3 converter site, if you know how to Google then you’ve probably found one of these already.

tl;dr: is asked to fix printers:

Get the latest ‘youtube-dl’ fork like yt-dlp. Use ffmpeg to convert.


Easy

Yeah there’s really nothing else you need here

The Other Method

  1. Get yt-dlp. Put it in a folder somewhere in C:\ like ‘youtubedownload’. Rename the .exe file to yt.exe.
  2. Get ffmpeg. Put it in the same folder. You could rename this .exe file if you want as well, the names will be the commands used in the future.
  3. Press the WINDOWS key, and type ‘path’.
    (INCOMING WALL OF PICTURES)
  4. Choose ‘Enviroment Variables’
    enviroment variables pointer
  5. Then,
    edit path detailed pointer
  6. You can then add a new entry for the ‘path’ environment variable. The system uses this to allow the executing directory to be in any directory listed in the path. Meaning, when you run a command in CMD, the system will always check any directories in the ‘path’.
    add new path entry
  7. Click OK on all open windows after adding the directory the exes are in to the ‘path’.

Example Usage

We will be using this song from YouTube: Moving Romance – Yoann Garel. It’s also available on Soundcloud here.

Right click on your Desktop > ‘Open Command Window Here’. If you don’t have this option in the context menu, you can download these registry edits to add it.

Next type the name of the yt-dlp .exe followed by a space and the url. So if you renamed it ‘yt’ like stated previously, it would look like so:
yt https://www.youtube.com/watch?v=dIMdcJWOEFM
Hitting enter will start downloading that video to the desktop directory you just launched the CMD window in. (Hint! If you want to use a Soundcloud URL like we have below, that will work too! Isn’t technology great?)
yt-dl download example

If you want to convert the resulting video to a proper audio file like .mp3, you have two options. You can use the quick solution right from yt-dl:

yt -x --audio-format mp3 [video_url]

Or to download a playlist:

youtube-dl --extract-audio --audio-format mp3 -o "%(title)s.%(ext)s"

You can ignore missing (“unavailable in your country”, or removed) videos with an -i flag. If your playlist isn’t working and the URL contains v=<ID>, remove it so just the ?list= item is in the query string.


Or, since ffmpeg is useful for other tasks (and you should have it anyway), you can use it directly. A simple syntax of an ffmpeg command that would convert to an mp3 would look like ffmpeg -i [input file name] [output file name].[output file extension]. But wait, we don’t want to type that long, ugly file name in that yt-dlp just spit out onto our desktop… luckily we have a trick for that.

Run ‘dir /x‘ in the open CMD window.dir /x example yt
This is an extremely helpful windows command that will show ‘short’ filenames for files, making working with longer file names a breeze. Windows is telling us in the screenshot above that we can refer to the video we just downloaded as ‘moving~3.web’. Now assuming no renaming of the ffmpeg .exe took place in the setup step, our command simply becomes:

ffmpeg -i moving~3.web output.mp3
ffmpeg -i output.mp3 example

And you’re done! You now have ‘output.mp3’ on your desktop saved as the song we were just playing on YouTube. I’ve combined this process with scripted metadata adding/titling for an offline library. And, with the right yt-dlp commands it can even become an efficient way to export entire playlists of music.


It helps me if you share this post

Published 2022-03-06 02:23:43